
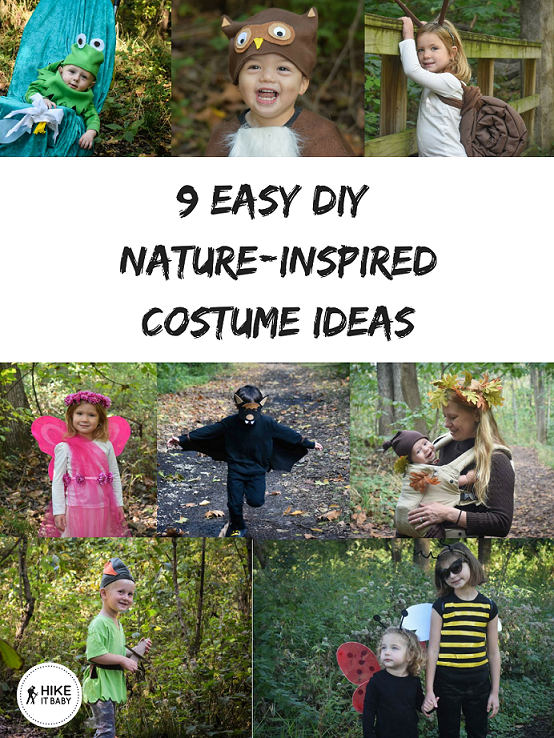
Easy DIY Nature-Inspired Costume Ideas

It's not a secret that kids love to dress in costume – be it a pirate, fairy, police officer, dinosaur, movie character or whatever it is they've gravitated to that day. And most of the time, they'll keep it on. ALL. DAY. LONG. The time is approaching when parents have to think about what their kids will be dressed up as this year. Below are some quick and easy DIY costume ideas – inspired by nature – to help jumpstart your creative juices.
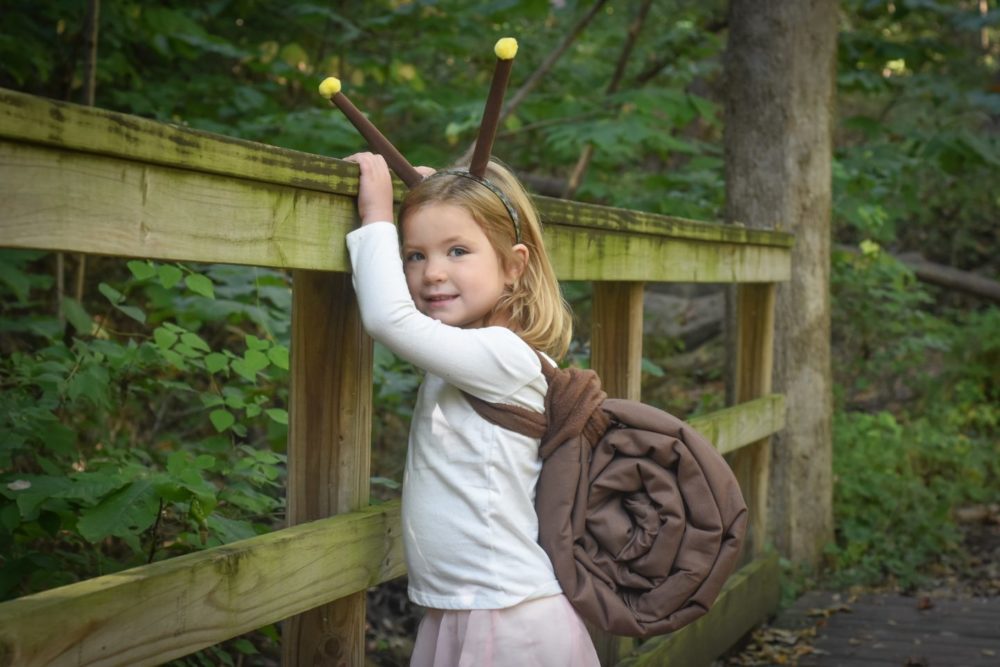
A snail crossing the trail is always a nice distraction. We can all agree the spiral design of a snail's shell is an amazing work of wonder. How does a snail manage to carry the weight of its shell in its lifetime?
Materials: Brown fabric (the more lightweight the better), head band, yellow pompoms, a piece of paper, long brown felt for the straps
Instructions: Fold the fabric lengthwise until you get the desired width you want. Start rolling from one end, wrapping it around itself, to create a spiral. Secure the end with several large, sturdy safety pins. You can also use safety pins inside the shell to make it more secure. For the tentacles, cut the paper in half and roll into two scrolls; hot glue it closed. You can adjust the height by cutting it shorter. Roll brown fabric over the paper and glue it shut. Apply hot glue liberally to the end that will attach to the headband; then add a pompom to the top of each tentacle. Carefully insert the long brown felt inside the top layer of the shell and pull until both ends come out equal. Wrap the strap over your kiddo's shoulders and around itself in back to make sure it's sturdy and not drooping. And voila – let the oohing and aahing commence!
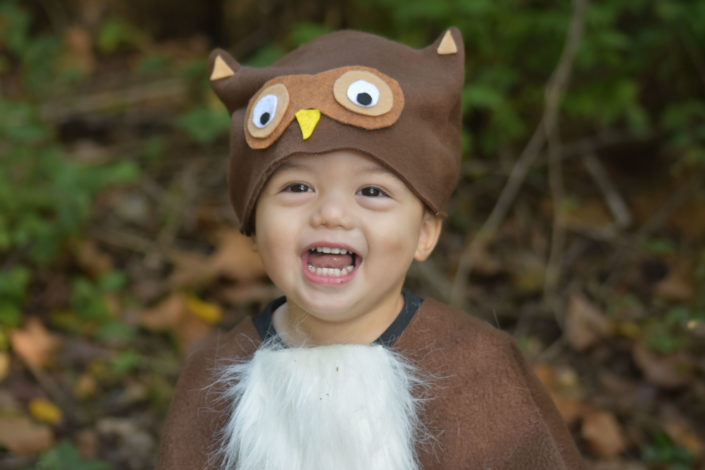
Remember when your perfect little angel slept through the day, but then kept you up all night, convincing you he might be a nocturnal creature? Yeah ... don't miss those times at all.
Materials: Brown felt fabric, faux fur, 8.5x11 felt sheets in two shades of brown, black, white and yellow
Instructions: Cut a small section off the brown felt fabric and set aside for the hat. Fold the larger fabric in half and in half again. At the bottom of the folded edge, cut a large curve up to the opposite corner. At the folded inside corner, cut a smaller curve so you have a poncho when you open it. (Note: Start with a smaller cut in the neck area. If it's too small, cut a little more at a time until you can pull it over your child's head.) Sew, glue or pin the faux fur to the chest. To make the hat, fold the leftover fabric in half and cut out the owl head shape and sew the pieces together. Cut an 8-shape from the darker brown felt sheet and circles out of the other sheets except the yellow. Glue all the pieces together to make eyes. Cut a yellow triangle for the nose and two light brown triangles for the ears.
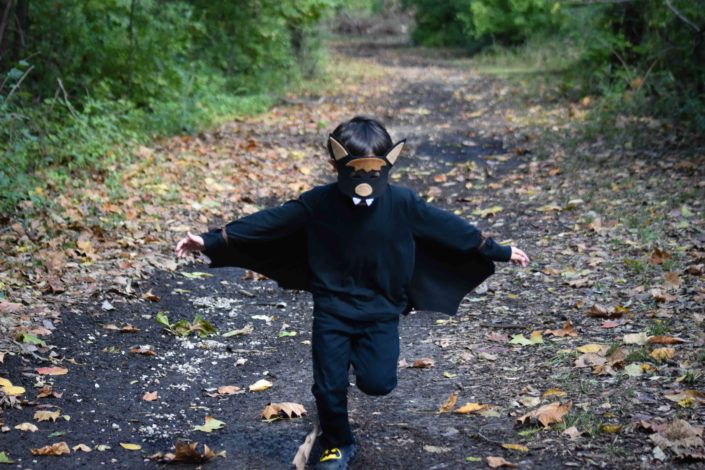
Bats swoop by swiftly, and sometimes the only indication of them is the fluttering of wings. Kids are like bats; they're fast and run out of sight quickly. Hey, come baaaaaaaack! Sound familiar?
Materials: Black felt fabric, black ribbon, foam sheets in white and two tones of brown
Instructions: For the wings, fold the felt in half and in half again. From the bottom corner, cut inverted scallops up to the opposite corner. Cut out some of the remnants and sew to the ends as ties. For the mask, cut a bat face shape out of black foam and make the eye holes. Cut the remaining pieces for the face and glue the pieces on. Finally, cut the ribbon into two equal lengths and hot glue it on to each side of the mask. Use a large sturdy safety pin and attach the wings to the back of the shirt and tie the straps to the wrists.
Everyone has a little Peter Pan in them, regardless if they're 18 months or 94 years old. A bit of mischief, a bit of adventure, a bit of fearlessness – and a whole lot of fun and heart.
Materials: Green shirt, brown fabric, green and red felt, cardboard
Instructions: To look like the boy who wanted to live forever, cut zig zags into the bottom of the shirt, and cut a slit on the front neckline. For the hat, fold the green felt in half and cut a triangle and sew two sides together. Cut a feather shape out of the red felt and hot glue it to the hat. To make the dagger, cut two small rectangular pieces of cardboard. Make a slit in the middle of one piece of cardboard. On the other, cut a pointy tip on one end and insert it through the slit. For the finishing touch, cut brown fabric for the belt and tie it around your little's waist.
A turtle in its natural habitat is always exciting to see on the trails. Despite a certain childhood story leading us to believe turtles are slow, they are surprisingly quick on their feet.
Materials: Green felt fabric, two shades of brown felt sheet, brown fabric and an aluminum pan
Instructions: Dress your little one in all green. Cut a long strip of green felt and set aside later for the strap. For the shell, cover the aluminum pan with green felt and tie the ends together. (Any excess material can remain in the pan.) Make ovals out of the lighter brown felt sheet and glue them on the shell. Cut brown fabric and fold it over into a head band. Cut out circles from the remaining brown felt sheets for the eyes and glue them to the head band. Loop the long strip of green felt through the inside of the shell and loop it in front your kiddo's shoulders to the back and tie it underneath. Any excess material will again stay inside the pan.
Fairies spread pixie dust wherever they go and the land turns into a magical playground of life and energy. And there's something special and sweet about seeing littles one running around with fairy wings.
Materials: Pink tulle, pink ribbon, artificial pink flowers, floral wire (Note: You can go with any color you want for this ensemble.)
Instructions: Measure and cut the pink ribbon so that it fits around your little one's waist. Hot glue flowers to the ribbon every few inches apart. Lay the tulle over your child's shoulder – or both shoulders if you want – and tie the ribbon around the waist to secure the tulle. (You can use as many layers of tulle as you want depending on your preferences.) String flowers through the floral wires until the length fits your child's head, then form it into a wreath. Finish the look off with store-bought wings or make your own!
What's not to love about matching sibling costumes? There are so many creative options available for partner costumes, and you don't have to spend very much when you make it yourself.
Materials: Black shirt, yellow duct tape, black pipe cleaners, head bands, white poster-sized cardstock and black cardstock, black ribbon
Instructions: To make the bumble bee top, lay the shirt on a flat surface and apply yellow duct tape across the shirt to make the stripes; do this on the front and back. For the wings, fold the white poster cardstock in half and cut out the wings at the fold. Cut the black ribbon to the desired length to fit around your kiddo's shoulders and glue them to the inside of the wings. With the black cardstock, cut two ovals big enough to cover the middle of the wings and glue one on the front and the other on the back for extra security. For the antennas, wrap one end of the pipe cleaners to the head band. Do the same for the ladybug antennas. Cut four circles from leftover black cardstock and glue two together so you have a pair, then insert the pipe cleaner between each pair and hot glue it shut. You can buy ladybug wings or make your own.
Having a baby doesn't mean parents have to sit out on all the fun. Nowadays, it's popular to take advantage of having the baby in a carrier and you both dress in complementary costumes. You'll definitely be the hippest duo!
Materials: Brown fabric, artificial leaves, floral wire
Instructions: With consideration for how warm it can get for both mama and baby with a carrier, this is pretty easy to put together and take off if either one gets too overheated. To make the acorn hat, fold the brown fabric in half and cut out a long triangle; sew the pieces together to form the hat. Twist and tie a knot at the tip of the hat to make the acorn stem. For mama's wreath, string the leaves through the floral wire until the length fits around mama's head. Easy-peasy!
Make your stroller do double duty by decking it out to match your baby's costume. If you're going to wheel your kiddo around anyway, might as well make it look cool and draw attention.
Materials: Blue fabric, green felt fabric, white felt fabric and felt sheets in yellow, blue, white and black
Instructions: With half of the green felt, cut out the hat and sew the pieces together. Cut circles from the white and black felt sheet for the eyes and hot glue it to the top of the hat. The rest of the green felt will be used for the collar. Cut a long piece of fabric and trim zig zags along one side. Cut a half circle into the other end for the neck and wrap it around the baby's neck. Making a collar this way is easier and quicker to take off should the baby get overheated or fussy, so there's no pulling necessary.
To make the lily pad stroller, you need to make the fish and lily separately for easy assembly later. Cut fish shapes out of blue felt sheets and circles from white and glue on the eyes. To make the lily, cut long thin triangles out of the white felt fabric. Fold the ends together and secure the corners with needle and thread. Continue with all the triangle pieces, joining them together at the folds and spreading the petals out. Cut the yellow fabric sheet in thirds (8.5x3.6) and cut fringes along one side of each. Roll each one up and hot glue the ends together. Use hot glue liberally on the end of the flower and attach it to the white petals. When you're ready to jet on your adventure, cover the stroller with the blue sheet and safety pin the fish and lily pad on the stroller. If you're worried about the seat belt straps showing, you can adjust the material around the baby so it looks natural.
 Snail
Snail
A snail crossing the trail is always a nice distraction. We can all agree the spiral design of a snail's shell is an amazing work of wonder. How does a snail manage to carry the weight of its shell in its lifetime?
Materials: Brown fabric (the more lightweight the better), head band, yellow pompoms, a piece of paper, long brown felt for the straps
Instructions: Fold the fabric lengthwise until you get the desired width you want. Start rolling from one end, wrapping it around itself, to create a spiral. Secure the end with several large, sturdy safety pins. You can also use safety pins inside the shell to make it more secure. For the tentacles, cut the paper in half and roll into two scrolls; hot glue it closed. You can adjust the height by cutting it shorter. Roll brown fabric over the paper and glue it shut. Apply hot glue liberally to the end that will attach to the headband; then add a pompom to the top of each tentacle. Carefully insert the long brown felt inside the top layer of the shell and pull until both ends come out equal. Wrap the strap over your kiddo's shoulders and around itself in back to make sure it's sturdy and not drooping. And voila – let the oohing and aahing commence!
 Owl
Owl
Remember when your perfect little angel slept through the day, but then kept you up all night, convincing you he might be a nocturnal creature? Yeah ... don't miss those times at all.
Materials: Brown felt fabric, faux fur, 8.5x11 felt sheets in two shades of brown, black, white and yellow
Instructions: Cut a small section off the brown felt fabric and set aside for the hat. Fold the larger fabric in half and in half again. At the bottom of the folded edge, cut a large curve up to the opposite corner. At the folded inside corner, cut a smaller curve so you have a poncho when you open it. (Note: Start with a smaller cut in the neck area. If it's too small, cut a little more at a time until you can pull it over your child's head.) Sew, glue or pin the faux fur to the chest. To make the hat, fold the leftover fabric in half and cut out the owl head shape and sew the pieces together. Cut an 8-shape from the darker brown felt sheet and circles out of the other sheets except the yellow. Glue all the pieces together to make eyes. Cut a yellow triangle for the nose and two light brown triangles for the ears.
 Bat
Bat
Bats swoop by swiftly, and sometimes the only indication of them is the fluttering of wings. Kids are like bats; they're fast and run out of sight quickly. Hey, come baaaaaaaack! Sound familiar?
Materials: Black felt fabric, black ribbon, foam sheets in white and two tones of brown
Instructions: For the wings, fold the felt in half and in half again. From the bottom corner, cut inverted scallops up to the opposite corner. Cut out some of the remnants and sew to the ends as ties. For the mask, cut a bat face shape out of black foam and make the eye holes. Cut the remaining pieces for the face and glue the pieces on. Finally, cut the ribbon into two equal lengths and hot glue it on to each side of the mask. Use a large sturdy safety pin and attach the wings to the back of the shirt and tie the straps to the wrists.
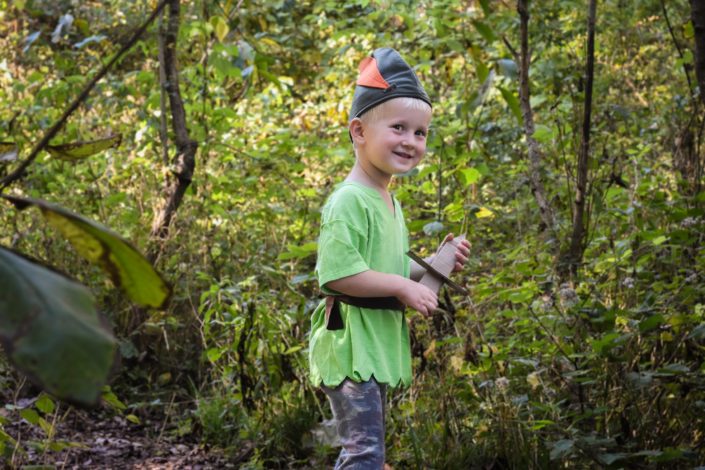 Peter Pan
Everyone has a little Peter Pan in them, regardless if they're 18 months or 94 years old. A bit of mischief, a bit of adventure, a bit of fearlessness – and a whole lot of fun and heart.
Materials: Green shirt, brown fabric, green and red felt, cardboard
Instructions: To look like the boy who wanted to live forever, cut zig zags into the bottom of the shirt, and cut a slit on the front neckline. For the hat, fold the green felt in half and cut a triangle and sew two sides together. Cut a feather shape out of the red felt and hot glue it to the hat. To make the dagger, cut two small rectangular pieces of cardboard. Make a slit in the middle of one piece of cardboard. On the other, cut a pointy tip on one end and insert it through the slit. For the finishing touch, cut brown fabric for the belt and tie it around your little's waist.
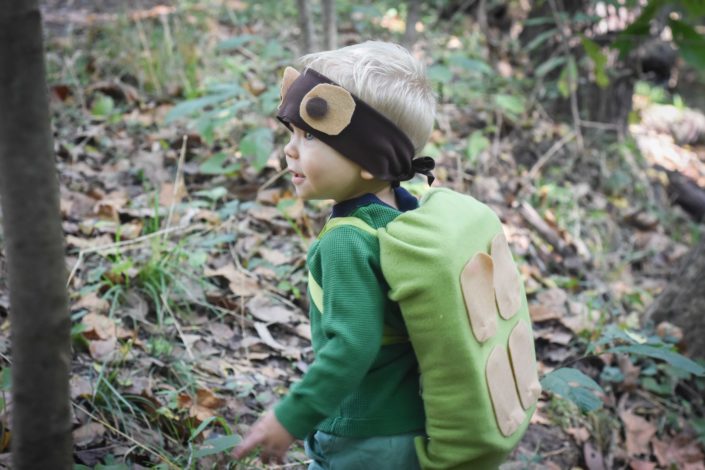 Turtle
A turtle in its natural habitat is always exciting to see on the trails. Despite a certain childhood story leading us to believe turtles are slow, they are surprisingly quick on their feet.
Materials: Green felt fabric, two shades of brown felt sheet, brown fabric and an aluminum pan
Instructions: Dress your little one in all green. Cut a long strip of green felt and set aside later for the strap. For the shell, cover the aluminum pan with green felt and tie the ends together. (Any excess material can remain in the pan.) Make ovals out of the lighter brown felt sheet and glue them on the shell. Cut brown fabric and fold it over into a head band. Cut out circles from the remaining brown felt sheets for the eyes and glue them to the head band. Loop the long strip of green felt through the inside of the shell and loop it in front your kiddo's shoulders to the back and tie it underneath. Any excess material will again stay inside the pan.
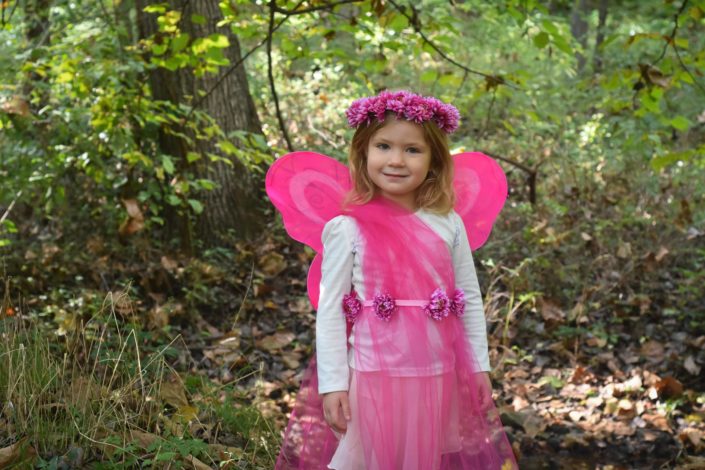 Garden Fairy
Fairies spread pixie dust wherever they go and the land turns into a magical playground of life and energy. And there's something special and sweet about seeing littles one running around with fairy wings.
Materials: Pink tulle, pink ribbon, artificial pink flowers, floral wire (Note: You can go with any color you want for this ensemble.)
Instructions: Measure and cut the pink ribbon so that it fits around your little one's waist. Hot glue flowers to the ribbon every few inches apart. Lay the tulle over your child's shoulder – or both shoulders if you want – and tie the ribbon around the waist to secure the tulle. (You can use as many layers of tulle as you want depending on your preferences.) String flowers through the floral wires until the length fits your child's head, then form it into a wreath. Finish the look off with store-bought wings or make your own!
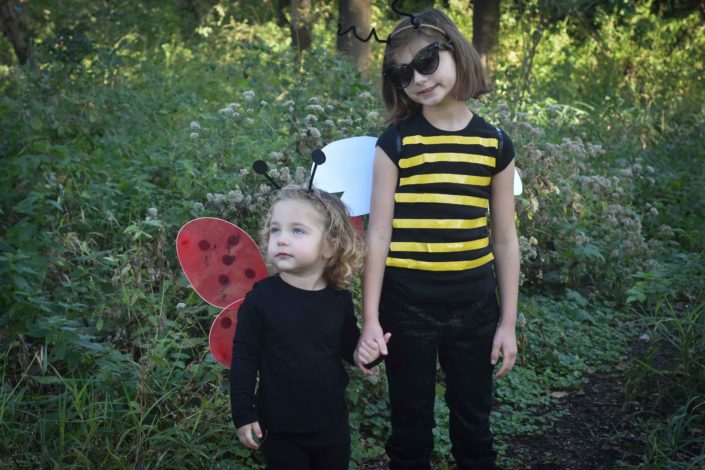 Partner costumes: Bumble Bee and Ladybug
What's not to love about matching sibling costumes? There are so many creative options available for partner costumes, and you don't have to spend very much when you make it yourself.
Materials: Black shirt, yellow duct tape, black pipe cleaners, head bands, white poster-sized cardstock and black cardstock, black ribbon
Instructions: To make the bumble bee top, lay the shirt on a flat surface and apply yellow duct tape across the shirt to make the stripes; do this on the front and back. For the wings, fold the white poster cardstock in half and cut out the wings at the fold. Cut the black ribbon to the desired length to fit around your kiddo's shoulders and glue them to the inside of the wings. With the black cardstock, cut two ovals big enough to cover the middle of the wings and glue one on the front and the other on the back for extra security. For the antennas, wrap one end of the pipe cleaners to the head band. Do the same for the ladybug antennas. Cut four circles from leftover black cardstock and glue two together so you have a pair, then insert the pipe cleaner between each pair and hot glue it shut. You can buy ladybug wings or make your own.
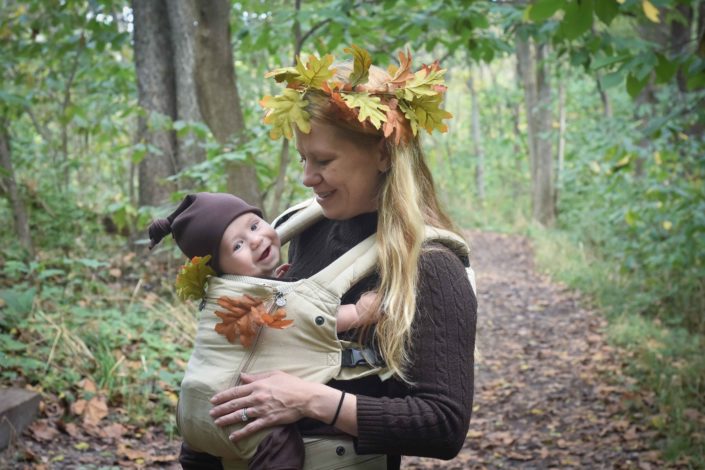 Mommy and baby costumes: A tree and her acorn
Having a baby doesn't mean parents have to sit out on all the fun. Nowadays, it's popular to take advantage of having the baby in a carrier and you both dress in complementary costumes. You'll definitely be the hippest duo!
Materials: Brown fabric, artificial leaves, floral wire
Instructions: With consideration for how warm it can get for both mama and baby with a carrier, this is pretty easy to put together and take off if either one gets too overheated. To make the acorn hat, fold the brown fabric in half and cut out a long triangle; sew the pieces together to form the hat. Twist and tie a knot at the tip of the hat to make the acorn stem. For mama's wreath, string the leaves through the floral wire until the length fits around mama's head. Easy-peasy!
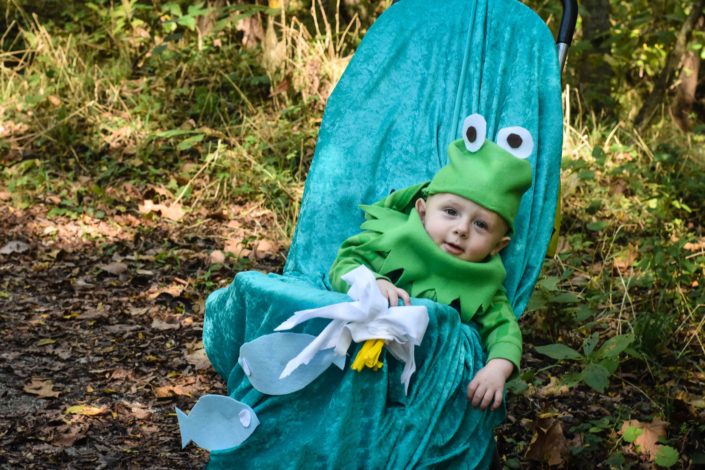 For the baby and his favorite ride: Frog and lily pad
Make your stroller do double duty by decking it out to match your baby's costume. If you're going to wheel your kiddo around anyway, might as well make it look cool and draw attention.
Materials: Blue fabric, green felt fabric, white felt fabric and felt sheets in yellow, blue, white and black
Instructions: With half of the green felt, cut out the hat and sew the pieces together. Cut circles from the white and black felt sheet for the eyes and hot glue it to the top of the hat. The rest of the green felt will be used for the collar. Cut a long piece of fabric and trim zig zags along one side. Cut a half circle into the other end for the neck and wrap it around the baby's neck. Making a collar this way is easier and quicker to take off should the baby get overheated or fussy, so there's no pulling necessary.
To make the lily pad stroller, you need to make the fish and lily separately for easy assembly later. Cut fish shapes out of blue felt sheets and circles from white and glue on the eyes. To make the lily, cut long thin triangles out of the white felt fabric. Fold the ends together and secure the corners with needle and thread. Continue with all the triangle pieces, joining them together at the folds and spreading the petals out. Cut the yellow fabric sheet in thirds (8.5x3.6) and cut fringes along one side of each. Roll each one up and hot glue the ends together. Use hot glue liberally on the end of the flower and attach it to the white petals. When you're ready to jet on your adventure, cover the stroller with the blue sheet and safety pin the fish and lily pad on the stroller. If you're worried about the seat belt straps showing, you can adjust the material around the baby so it looks natural.
Read more
Photos credit: Vong Hamilton
Related Content


Comments