Types of Water Treatment for Hiking and Backpacking

  1. Share
0 0
Types of Water Treatment for Hiking and Backpacking by Becca Hosley for Hike it Baby I’m a big believer that some of the best family memories occur outside. When I think back to my own childhood, the memories that come the quickest involve family camping trips, S’mores by the fire my siblings and I helped build, long hikes in the woods and boiling endless pots of water to kill the “water bugs” as my dad called them. Yep, even 20 years ago we were worried about water pathogens. This has become a problem with natural water sources, but there are various water treatment methods that are currently available to keep you and your family safe so you can focus on making outdoor memories rather than suffering through bad ones.

Why Can’t We Just Drink the Water from Natural Sources?

With environmental decline, along with an increase of livestock, human traffic on trails and wild animals near water sources, water quality (even in the more remote areas) is declining. Even if water from natural sources looks clean and clear and you can see every tiny organism and rock on the bottom of the water bed, it could still be harboring pathogens such as protozoa, bacteria and viruses that can make you and your family very sick. These pathogens can cause a myriad digestive problems (such as diarrhea, vomiting, etc.) or worse, depending on the type of pathogen you are dealing with. As a result, studies performed by the Center for Disease Control and Prevention conclude that you should always filter and disinfect water from natural sources.

Is there a Difference Between Water Purification and Filtration?

While both purification and filtration methods can remove pathogens from water, they do so in different ways. Filtration techniques provide a barrier that blocks most pathogens while still allowing water to pass through. The one downside is the fact that while filtration may work well against bacteria and protozoa, they don’t always stop tiny viruses from slipping through with the water. That being said, filtration techniques are the most widely used by backpackers in the United States because water-borne viruses in natural water sources are extremely rare in the Unites States. If you plan to use a natural water source while hiking, camping or backpacking internationally (or if you want to be extra cautious in the U.S.), purification is the method of choice. It gets rid of or immobilizes most (if not all) water-borne pathogens, including viruses that are too small to be caught through filtration methods. While some filtration methods also purify the water, purification is mainly done through sterilization (think boiling) or chemical methods.

What are Some Water Treatment Systems Available?

Not all treatment systems are created equal, and all have pros and cons associated with them. Below is a list of some common methods along with the advantages and drawbacks to each method. I have broken them into two categories based on activity, but there can be crossover depending on the situation.

Camping and Backpacking: Most quantity of water needed and time isn’t a factor

1. Boiling (purification)

Pros: The most low-tech and easy technique of all those mentioned here is to boil your water. Bring it to a “rolling boil” for a minute (or three minutes at altitudes above 6,500 ft.). This is also cost-effective (for the most part) since you likely already have a cook-set with you.

Drawbacks: Fuel is needed, whether in the form of a gas canister or wood. Gas can be heavy, and if it runs out, there is no way to replenish it when you’re far away from civilization (this is especially an issue where open fires are not allowed). And between bringing the water to a boil and waiting for it to cool down enough to drink, it is a slow treatment option!

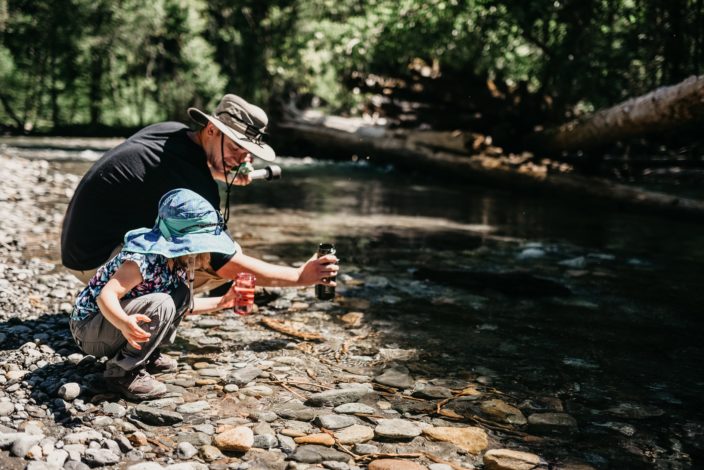
2. Pump (most use filtration, but a few also purify)

Pros: There are generally three main components to a pump: the filter, the hand-held pump and the tubes. The intake tube (or “dirty” tube) is placed in the water source while the outlet tube (or “clean” tube) is placed into your water container. You then go to work pumping water from the source through the filter and into your container. Or better yet, getting the kids involved could make this a fun and educational experience for them (if you play your cards right and call it a game or competition, you may not have to do any of the pumping yourself!). This technique is fairly quick depending on how fast you are pumping and works well in shallow water. It also works well for both single and group use and can filter out sediment so your water isn’t gritty.

Drawbacks: Pumping can be tiring, especially if you are pumping water for a group. They are bulky, with the tubes and filter taking up quite a bit of space. This is no big deal if you are car camping in the backcountry, but it can add quite a bit of weight and take up precious room while backpacking (especially if you are carrying the extra gear of your little ones during a family backpacking trip).

  3. Chemical Water Treatment (purification)

Pros: This is what many consider the “old-school,” yet still highly effective method of treating water. You simply drop a tab or drops into your water container, shake it around, and then wait the allotted time for the chemical to kill the pathogens. They are lightweight, inexpensive and super easy to use. If you choose a different method of water treatment, many outdoor experts recommend carrying this treatment option as a backup just in case your equipment malfunctions. Due to the drawbacks of iodine tablets (terrible taste, danger to pregnant mamas and those with thyroid problems, ineffectiveness against the Cryptosporidium parasite, etc.), Chlorine dioxide is generally the chemical method of choice.

Drawbacks: It takes anywhere from 30 minutes to four hours for the chemical to work. Large amounts of water will require a higher quantity of the chemical, which can be a problem if you didn’t pack enough water with you.
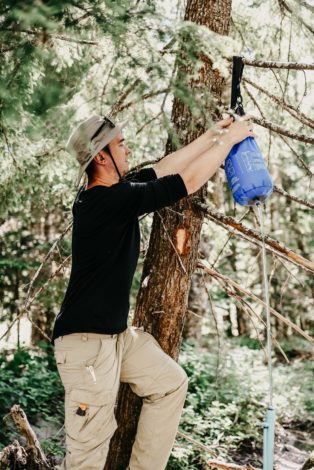
4. Gravity (filtration)

Pros: Here is a method that works very similar to pump filters, but it lets gravity do the work for you. Most models come with two water bladders (one for the “dirty” water and one for the “clean” water that is filtered) along with a series of hoses and the filter unit. You fill the “dirty” bag with water from the natural source and hang it on a tree or tall rock before hooking up the hoses and filter along with the “clean” water bag at the bottom. You can then sit back and relax, set up camp, play some family games, practice some yoga, whatever you want while you let gravity filter your water at a pretty fast rate (around 2 liters per minute). Gravity filters, like the Lifestraw Mission, do not need a power source as well so you can use this anywhere.

Drawbacks:  Could be more difficult in shallow water as you need to fill the water bladder.

Types of Water Treatment for Hiking and Backpacking by Becca Hosley for Hike it Baby

Hiking – Requires lower volumes of water, but need water fairly quickly

1. Squeeze (filtration)

Pros: Do your kids love to squeeze things (my little dude is all about the squeeze pouches, squeeze glue, squeeze mud, anything squeezable)? If so, this may be a great option for you! The squeeze filter (like the Lifestraw Flex) consists of a bag, the compact filter unit, and whatever you want to squeeze the water into (whether it be another bag or straight into your mouth). You simply fill the bag with water from the source and squeeze it through the filter. They are easy to use, lightweight, and provide water immediately. And that’s on top of being fun for the kids to use! Filters like the Lifestraw Flex protect against microplastics, parasites, bacteria, and reduces chemicals and heavy metals like lead.

Drawbacks: They can get clogged quickly depending on the water source, requiring cleaning or backflushing. They are not ideal for large quantities of water, making this a more appropriate treatment option for hiking as opposed to camping or backpacking.

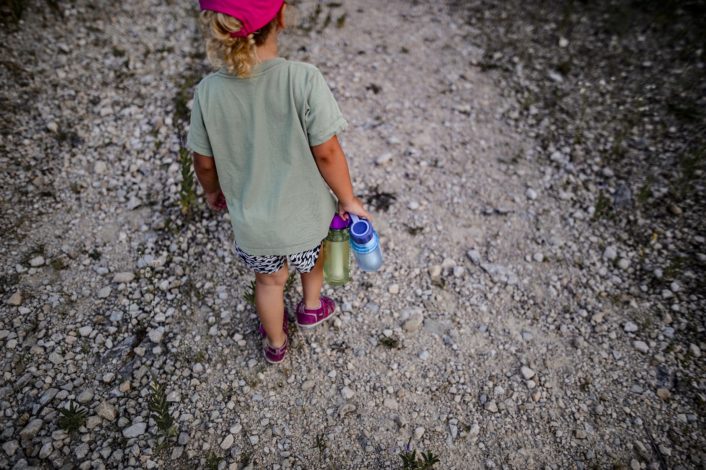
2. Water Bottle Filters (filtration or purification depending on brand)

Pros: Water Bottle Filters (filtration or purification depending on brand): These bottles have built-in filtration or purification elements. Some use the suction you provide when you sip from the bottle while others work like a coffee press or use UV light to filter/purify your water. They are easy to use for the whole family, and tend to be reasonably priced. The new Lifestraw Play is designed for kids with it’s two stage filtration and leak proof design. The lid is a great feature to keep dirt and sand out of straw. For an adult option, check out the Lifestraw Go.

Drawbacks: As with the squeeze filters, they may get clogged and require cleaning while on the trail. The Play and Go can be cleaned by blowing air through the mouthpiece until water drains out of the bottom of the filter to backflush it and prevent it from clogging. The amount of water you filter is limited by the size of the bottle, making this method better suited for long family hikes near water sources as opposed to camping/backpacking.

3. Straw (mainly filtration, though some high-end models offer purification)

Pros: This method is similar to the squeeze and water bottle filters except instead of attaching to a pouch or a bottle, the filter is placed directly into a water sources and you suck through it like a straw. These are very lightweight and fairly small, so they won’t take up a large amount of space in your bag.

Drawbacks: There is no way to store the water, making this better suited for a hike that follows a water source (which is also why it is not ideal for camping or backpacking). Many reviews report that it can be difficult to suck water through the straw, making this not a good option for kids. They can get clogged, forcing you to clean it on the trail. It’s just plain awkward to hunker down with your face almost in the water every time you want to take a drink. I usually keep one in my pack as a backup, but it is not my first option for filtering my water.

Types of Water Treatment for Hiking and Backpacking by Becca Hosley for Hike it Baby 4. Ultraviolet Light Purifiers (purification)

Pros: You simply place the probe of this pen-like device into the container of water you want to treat and swirl it around for a specific amount of time (usually around 60 seconds) to neutralize the pathogens in it. Unlike most filters, you never have to clean or replace any parts on this device (other than maybe the batteries), and it is very easy to use.

Drawbacks: This unit requires batteries, and one of the chief complaints from users is that it goes through battery-power quickly. Since there are no parts that can be cleaned or fixed, you run the risk of malfunction (which is why it is always good to bring a back-up treatment method!) Since you are not filtering your water, sediment found in the water has nowhere to go. This makes the unit take longer to purify the water, and means that you will be ingesting that sediment unless you first filter the water with another method. Multiple treatments are required to purify larger amounts of water, and if the water sits around for a while, the neutralized pathogens may become active again (making this more suited to hiking vs. camping and backpacking).

With so many water treatment options, it may be difficult to choose which ones to try out on your next adventure. Does your family have a favorite method of water treatment while on the trail or at the campsite? Let us know in the comments below! Photos by Deanna Curry and Laura Castro.

Read More:

This post is sponsored by Lifestraw. Stay hydrated wherever you go, because adventures await! Get ready for a family-friendly summer. LifeStraw has some great new gear especially designed for kids to take your explorations to the next level. LifeStraw filters remove bacteria, parasites, microplastics, and chemicals from water, making it safe to drink. The new LifeStraw Play is the first water filter for children with this level of protection. Kids can simply fill their bottle at a water fountain, lake, stream or any other freshwater source and enjoy clean, great-tasting water! Check it out here and use code HIKEIT20 at checkout for 20% off through the end of July.  

Community tags

This content has 0 tags that match your profile.

Let's Talk Gear & Snacks

Comments

To view comments or leave a comment, login or sign up.

Related Content

0
Enjoying Outdoor Summer Adventures with Little Ones
CREATED IN PARTNERSHIP WITH OUR FRIENDS AT ERGOBABY Don’t let the higher temperatures keep you inside this summer! Even with the littlest additions to your family, there are ways to stay safe while exploring in warmer weather. With extra preparation (and maybe a few new gear items), your family can stay cool while enjoying those long summer days. Check out these tips for what to wear, when and where to go, gear to consider, and fun activities that will surely put a smile on everyone’s face.   What to Wear You may think less clothing is best in warm weather, but you may do more harm than good going this route. The radiation from the sun is most potent in summer since the earth is tilting towards the sun in these months. That means the risk of damage to your skin and eyes is at its highest. Consider these clothing options to cover up the skin (especially sensitive baby skin!) while keeping cool. Sun-Protective Clothing Avoid the sunscreen battle by purchasing sun-protective clothing. This clothing, whether a shirt, pants, etc., offers sun protection while keeping the wearer cool. Look for lightweight options with a UPF rating 50+ for maximum sun protection. Sun Hats Keep those little faces and necks protected with a quality sun hat. The wider the brim, the better protection from the sun’s damaging UV rays. Since the face, ears, and neck are three of the most common areas that develop skin cancer, this article of clothing is essential, especially for little ones. Sunglasses Who doesn’t love a cool pair of shades? They also happen to protect your eyes from damage. Just be sure to look for ones with 100% UV protection to protect those developing eyes (especially if your kiddos have a habit of looking right at the sun after you tell them not to). These clothing items will help tremendously, but be sure to still use sunscreen on any exposed skin for anyone 6 months of age and older (for younger babies, speak to your pediatrician for recommendations on skin protection). Look for a water-resistant broad-spectrum sunscreen with an SPF rating of 30 or higher. Check out this post for more information on choosing a sunscreen and staying safe in the sun.   When and Where to Go When adventuring in the heat, try to aim for early-mid morning or later in the afternoon. The amount of solar radiation hitting the earth is highest between 11:00 am – 3:00 pm. During this time, the temperatures rise, and there is a higher risk of sun damage (especially for sensitive kid skin!). You can also check the UV index on most weather apps to determine how high it is for your location at any time (read this blog post for more information). If you plan to hit the trail or the park, seek options with plenty of shade. This not only makes for a cooler adventure, but it also cuts down on the amount of ultraviolet rays that reach you. Another great option is to choose a trail or location with a water feature. This could be a beach, a creek, or a splash pad. This will help everyone cool off and enjoy the rest of the adventure.   Gear to Consider While we always recommend bringing at the 10 Essentials whenever hiking or adventuring away from civilization, here are some other items to consider (or take special note of) while exploring in the heat. Hydration and Snacks While water and extra food are part of the 10 essentials, I wanted to note them here because they become even more essential in high temperatures. Generally speaking, during moderate exercise in mild temperatures, an average adult should drink around half a liter of water per hour. This number can double a liter per hour during especially hot and humid outings! Kids old enough to drink water should drink roughly half as much as their adult caregivers. Drinking water isn’t enough when you are sweating in the hot temperatures. You also need to replenish the electrolytes and nutrients (such as sodium and potassium) lost through sweat. Check out this article for tips on how to pack trail snacks for summer hikes. Child Carrier So many child carriers are on the market, and they are not created equal, especially when carrying a young one in the heat! For summertime babywearing, seek a carrier with lightweight, breathable fabric without sacrificing support. We love the Omni Breeze from Ergobaby because it’s highly breathable and allows you to carry your little one from newborn to toddler in various positions with no extra insert needed! If you’re looking for an option with a bit more stretch while staying supportive and ultra-lightweight, Ergobaby also has the super breathable Aerloom Baby Carrier, which is one of the lightest carriers on the market (it’s less than 1.5 pounds!). Cooling Accessories If your adventure takes you into the heat for a longer period of time, consider adding some cooling accessories to your gear list. This could be cooling towels (such as Frogg Toggs), portable fans that attach to your stroller or carrier, or a handheld mister to keep your family cool. These products promote the evaporation of moisture from your skin, which can help you better regulate your body temperature in hot conditions. This is especially important for little ones since they are less efficient at temperature regulation compared to adults. Stroller As temperatures rise, attaching a little portable heater (aka your child) to you may not be the best option. Taking along a stroller can be a lifesaver for both caregiver and child! It provides shade and airflow for your child and makes for a less stifling experience. I generally suggest jogging or all-terrain options for trails, but these strollers aren’t as practical for most other summer adventures. Instead, seek out a stroller with features that work for you, such as decent storage space, compact folding capabilities, and a sunshade that provides ample protection from the sun. One great option is the Metro Deluxe Stroller from Ergobaby. It is suitable for newborns to preschoolers with its near-flat recline and plush padding. It also folds up super small, making it easy to travel with or store in almost any vehicle. The adjustable handlebar and expandable storage basket make this stroller work for almost anyone and any adventure. Fun Summer Activity Options There are so many fun ways to explore the outdoors in summer! Here are some of our favorites that are sure to leave everyone smiling while you make lasting memories: Seek Out a Water Source There’s nothing quite as refreshing as playing in the water on a hot summer day. Here are some fun options to keep your family cool while making fun summer memories. Pool Time – Whether you belong to a local pool or have a small toddler pool in your backyard, pool time is a wonderful way to escape the heat while enjoying the outdoors. Creeks, Rivers, and Waterfalls – My family absolutely loves hiking to a water source on hot summer days! These could be slow creeks, narrow rivers, or glorious waterfalls to splash in. Splashy fun also makes the hike back more comfortable and bearable. Splash Pad – Babies and toddlers love sticking their hands and feet in the fountains and features of a splash pad. Head to the Beach – If you live near a lake or the coast, visiting the beach is an obvious choice for summer fun! Little ones love to build sand castles and stick their toes in the surf while hunting for crabs or shells. Farmer’s Markets and Festivals Farmer’s markets are fun to get outside while supporting local farmers and businesses by enjoying local produce and products. Festivals also provide fun entertainment (and rides for some) and delicious, unique food options. Fruit Picking Strawberries, blackberries, peaches, oh my! Picking fruit is such a fun experience, no matter your age. Seek a local you-pick farm to see which delicious fruit (or veggie) options grow near you in summer. Find a Nature Center Many state, local, regional, and national parks have nature centers on their lands. While each center varies, you can find a nice respite from the heat by exploring what they offer and learning about the local flora and fauna. You can also find more information about local trails and programs offered for families and children by speaking to rangers and staff at the nature center. Picnics at the Park Whether the park features a playground, a splash pad, nature trails, or a wide-open field, picnics are a great way to spend time in nature as a family. Pack a cooler or basket with some favorite foods, set out a blanket in a shady spot, and you’re ready to go! Fly a Kite There's just something mesmerizing about watching a kite soar through the air. Both of my boys loved watching me fly a kite in the summer breeze. Now they have their own kites to fly and are still mesmerized! Camping You may think I’m crazy for suggesting summer camping with little ones, but it’s totally doable! With some extra planning (and a little extra equipment to cool you down), camping in the summer may turn into your favorite adventure yet. Check out this post on how to camp with kids in the summer. Nature Scavenger Hunt Who doesn’t love to hunt for nature’s treasures? You can make this a teachable moment for little ones and have them seek out something in every color of the rainbow, or have them practice their numbers by finding 2 leaves, 3 acorns, etc. You can also make them a list of natural items and have them cross them off as they move down the trail. Check out this post for even more nature scavenger hunt ideas. Geocaching You can try geocaching if you want to take your treasure hunting further. Simply download the app (aptly named “geocaching”) and input your location to find caches near you. From there, you can click on an option to find the GPS coordinates, clues, difficulty level, etc. Everything can be done straight from your phone (no special equipment required). Just be sure to have a pen handy to sign the register when you find one! Check out this post for more information on geocaching with kids. Explore the Zoo Visiting the zoo is usually a big hit with kids of all ages, no matter the season. The great thing about visiting the zoo in summer is that they usually have shops, restaurants, or indoor exhibits along the way so you can take a break from the heat as needed.   What are your favorite ways to explore the outdoors in summer with your family? Let us know in the comments below!   Photos by Deanna Curry and Jessica Carrillo Alatorre ABOUT OUTGROWN OutGrown is a 501(c)(3) nonprofit that works to create a world where everyone can enjoy the physical and mental benefits of spending time outside. We are focused on creating opportunities and removing barriers to access so families with babies and young children can take their first steps outside. We believe all families have the right to connect with nature, benefit from spending time outdoors, and be inspired to a lifelong love of nature. Since its grassroots inception in 2013, OutGrown is a growing community of 280,000 families and over 300 volunteer Branch Ambassadors. More information on all of our programs can be found at WeAreOutGrown.org    EDITORS NOTE: We hope you enjoyed reading this article from OutGrown. We’re working hard to provide our community with content and resources that inform, inspire, and entertain you. But content is not free. It’s built on the hard work and dedication of writers, editors, and volunteers. We invest in developing premium content to make it easier for families with young children to connect with nature and each other. We do not ask this lightly, but if you can, please contribute and help us extend our reach.
0
Guide to Choosing the Right Boots for Your Family
An all-in-one guide to footwear for your family's winter adventures! In partnership with the awesome team at Merrell We know that time in nature is good for the mind, body, and soul all year round. However, uncomfortable kiddos (and their adults) make for a less-than-enjoyable experience for everyone. While choosing the right clothing layers is extremely important (check out this article on layering), having the wrong type of footwear can cut your outdoor fun short faster than it takes to say, “don’t jump in that slosh puddle, your shoes aren’t waterproof!” Choosing the right boots for your outdoor adventures is important, but purchasing the right footwear for chilly, wet months can be daunting. With so many options to choose from, how do you know which pair (or pairs) will fit the needs of your family? We have put this guide together to help take the guesswork out of the footwear debate, and help you find the boots that work best for your family. In this Article: Types of Boots Main Factors to Consider Key Boot Features Insider Tips for Choosing the Right Boots Rain boots vs. snow boots vs. hiking boots So you say you want a pair of boots. Boots are boots, right? Well, not exactly. Outdoor boots come in many different “flavors” that fit into three main categories: Rain boots, snow boots, and hiking boots. Rain Boots: If your adventure involves puddle splashing, rainy day adventures, look no further than the classic rain boot. You will generally find the most variety of colors, patterns, and styles in a rain boot, and they tend to be lighter weight and less expensive than hiking or snow boots. That being said, they also tend to come with a bit less traction and do not keep feet as warm as other boot types. Snow Boots: Snow boots are built to keep feet toasty warm when romping in snow and slush. They also come with better traction to navigate slippery terrain. Due to the better insulation, they also tend to be heavier and come with a higher price tag. Hiking Boots: These are the most versatile of the boots listed, depending on the features you choose. If your adventures tend to involve trails and you want a less specialized boot that can be worn over multiple seasons, this may be the way to go. They tend to be lighter than snow boots, but usually don’t provide the ankle support or height required for extra snowy adventures. Also, it can be more difficult to find fully waterproof hiking boot options.   Photo: Michelle Craig Main Factors to Consider The two main factors to consider when choosing a boot are the climate you live/play in and the type of activities you plan to participate in. Climate Your ideal boot selection will vary drastically depending on where you live. A snowy, frigid northern winter will require a high-quality snow or hiking boot with a colder temperature rating (see the section on warmth below). If you get a large amount of snowfall, you may also want to consider the height of the boot you choose. A taller boot will be more effective at keeping feet dry in comparison to an ankle-high boot. In contrast, a mild, drizzly southern winter may only require a set of rain boots. If you live in an area that receives very little (or very rare) snowfall, you may be able to get away with rain boots if you pair them with high-quality, warm wool socks (see tips section for budget-friendly hacks on how to make rain boots work in snow). Activity In addition to climate, it’s important to consider your intended outdoor activities when deciding which boot will work for you. If your kiddos will be wearing the boots to school, you may want to investigate flexible, breathable options (sometimes referred to as “sneaker boots”). If tromping through the snow on a winter hike is more your style, you will want to look for a boot with good traction and an appropriate temperature rating. Looking to puddle jump and keep feet dry on splashy afternoons? A tall rain boot may be just what you’re looking for. Key Features to think about: With your climate and outdoor activities in mind, some boot features will be more important than others. Here we have listed some of the key features to consider when choosing the right boots for your family. We highly suggest researching the features of any boots you are considering (either online or through an outdoor recreation store) to determine which of these features they have and which they are lacking. Waterproofing If your kiddos are like mine, they gravitate towards anything wet; puddles, snow, slush, etc. Unless you live in an area that stays fairly dry, I highly recommend purchasing waterproof boots. Even water-resistant options can become very wet and uncomfortable quickly. Fit and Comfort This one seems obvious, but trying to ask a distracted child how a boot “feels” can get you nowhere and lead to future issues. If possible, get yours and your child’s feet sized for BOTH length and width at an outdoor recreation store. I was surprised to discover my kiddo has wide feet, which explained why he often complained about his shoes and preferred to go barefoot. Also, bring the socks you plan to use with the boots when you try on the shoes. Cotton socks will provide a different fit than thick wool socks. Warmth Snow boots (and sometimes hiking boots) usually have a temperature rating that denotes the approximate lowest air temperature at which the boot insulation will keep feet comfortable. Just keep in mind that these ratings are only a guide, and can be affected by conditions such as weather, wearer’s activity level, exposure time, type of sock worn, cold sensitivity, etc. Generally speaking, a wet, snowy northeast winter will require a much different temperature rating compared to a mild, southern climate. Traction Chilly, wet weather often leads to slippery conditions. These conditions can lead to disastrous consequences (such as falls and injuries) when paired with active, excited kiddos or a baby-wearing adult. Choosing a boot with excellent traction (such as Vibram boot soles) can keep your feet on the ground and give you a little extra peace of mind that your family is less likely to slip. Weight Boots have come a long way in the last few decades. Even snow boots have become more lightweight and comfortable thanks to recent innovations in boot design and insulation. Unless your adventure involves long treks in frigid, wet conditions, choosing a boot that is lighter and more flexible without losing the insulation and waterproof properties will ensure that kiddos can have fun in the colder temperatures. Breathability While it’s important to keep moisture out of the boot, it’s also important to let moisture escape. Active families can make for sweaty feet, which can lead to icy toes if that moisture can’t escape. This can also lead to a build-up of odor-causing bacteria in the boot, which can cause boots to smell terrible after only a few adventures. Seek out a boot that is both breathable and contains anti-bacterial properties in the lining to keep feet comfortable and boots smelling fresh. Ease of Use Any caregiver will tell you that getting shoes on an excited toddler can be equivalent to wrangling an octopus. They could be the best boots in the world, but if it takes an hour to get them on your frustrated child, they aren’t worth it. Thankfully, shoe companies have heard our plea and now offer much easier methods to get shoes on little feet. Look for features such as medial zippers and toggle closures when choosing boots for active little feet. Insider Tips for Choosing the Right Boot My family has lived in various climates across the United States, from Colorado to Upstate New York, the Pacific Northwest, and now coastal Virginia. Here are some tips we have picked up along the way, along with tips from our amazing Hike it Baby Community to help you choose the right boots for our family (or make the boots you already have work when purchasing isn’t an option). General Tips Remember that our feet often swell a bit when we're hiking/walking/running, so sizing up can help prevent damage to toenails; especially when hiking downhill. My hiking boots and running shoes are a full size larger than the rest of my everyday shoes. Also, be wary of you or your kids possibly having wide feet. My youngest has wide feet and he swooned when I figured it out and got him Merrell hiking shoes in wide. – Alex Wong, Salt Lake City, UT Spend the extra money on waterPROOF footwear over water-resistant - this distinction has saved me on many, many hikes with wet grass or mud! – Erin, Durham, NC If you're looking to do all-day winter adventures with your little kids, invest in some winter hiking boots. Winter hiking boots will keep feet much warmer than play-quality snow boots. – Valerie, Adirondack Coast The best boot depends on the child, but I have found one thing to be true across the board… If you hike in chilly/cold weather with young children who spend a lot of time in the carrier but also like to hike a bit themselves you need to bring two types of boots. One, a down or similar booty that is strictly for warmth and protection from wind/rain/snow in the air. The other, a waterproof hiking boot that is not too big or too small worn with wool or similar socks. Oftentimes circulation to the feet is slightly inhibited by being in a carrier and heavy boots only make this worse. For families who feel like their child’s feet are always freezing while in the carrier, this will be a game-changer. – Lindsey Weir, Honolulu, Hawai’i (Formerly in Upstate NY and Washington State)   Budget-friendly tips Choose a boot that is versatile and can be worn in various conditions. My son calls his rugged boots “everything but summer” boots because they can be used for most of our outings with just a few tweaks in sock choices. – Becca, Chesapeake, VA It rarely snows where we live, so it doesn't make sense to invest in a lot of winter gear. When it does snow, I put thick wool socks under my son's rain boots. I wouldn't have him hike in difficult terrain that way, but it works well for playing. We also keep extra pairs of adult socks in our bag as backup mittens. They are also good as a way to add an extra layer of warmth to a baby's feet and legs and are hard for small hands to take off. – Carolyn, Greenville, SC I use bread sleeves and rain boots! My big boy’s feet are growing a mile a minute and the “men’s size” price can’t keep up! So, we put feet in wool socks, then bread sleeves, then a rain boot. Works great for hours of play, especially in North Carolina where snow is a once-a-year type of thing. – Kayla, North Carolina For boots that are lacking in traction (either from wear-and-tear or the type of boot), we use Yaktrax or other ice cleats for added stability in icy conditions. They are generally inexpensive and last for years. – Becca, Chesapeake, VA   Try Before You Buy When it comes to finding the right boot, I go to REI and try them on. They have such an amazing return policy that if I am not satisfied with them, I can bring them back. Even if I have hiked or walked in them. I also have done my research on the best boots for flat feet, because I have those and it's not fun. For winter boots I always make sure there is enough room for my feet with regular socks and wool socks and still room for air circulation because that is what helps keep your feet from getting cold. It's the same with my kids honestly. But they usually get second-hand shoes, so it's not always perfect. If it's not a perfect match, I don't feel so bad if they need something else. – Juliana, Alaska When making the selection in the store, bring or wear the socks you’re most likely going to be wearing with that boot/shoe. So often I'm trying on boots in thin cotton socks because that's what I'm wearing at the time but then wearing a thicker sock during the actual activity (like winter hiking) and the shoe/boot doesn't fit as comfortably as it did in the store. – Paige, Milwaukee, WI   Socks Can Be a Game-Changer I think an investment in good wool or synthetic socks would be key for a comfortable hike in any season. These socks will wick moisture off the skin and still insulate when wet. Cotton will soak your skin and keep your feet cold. A shoe with a good tread will add to the ease of hiking in wet, snowy, slippery conditions. And as always, keep a fresh dry pair of socks in the car for the ride home. – Christie, Richmond, VA Make sure you’re matching boots and socks - especially in cold weather, adding an extra pair of socks or thicker socks won’t help if your boots don’t have enough room for the extra volume, so size up if you’ll be adding extra sock volume. Especially important for folks with wide or tall feet that are already prone to being a bit squished if we’re not careful. – Gaila, Ames, IA Use different socks for different adventures but STAY AWAY FROM COTTON! Wool and synthetic socks come with different levels of thickness and cushioning, with thinner socks being great for summer adventures and thicker, more cushioned socks being ideal for colder conditions. – Becca, Chesapeake, VA Do you have extra tips on choosing the right boots to fit your family's needs? Let us know in the comments below!   ABOUT OUTGROWN OutGrown is a 501(c)(3) nonprofit that works to create a world where everyone can enjoy the physical and mental benefits of spending time outside. We are focused on creating opportunities and removing barriers to access so families with babies and young children can take their first steps outside. We believe all families have the right to connect with nature, benefit from spending time outdoors and be inspired to a lifelong love of nature. Since its grassroots inception in 2013, OutGrown is a growing community of 280,000 families and over 300 volunteer Branch Ambassadors. More information on all of our programs can be found at WeAreOutGrown.org    EDITORS NOTE: We hope you enjoyed reading this article from OutGrown. We’re working hard to provide our community with content and resources that inform, inspire, and entertain you. But content is not free. It’s built on the hard work and dedication of writers, editors, and volunteers. We make an investment in developing premium content to make it easier for families with young children to connect with nature and each other. We do not ask this lightly, but if you can, please make a contribution and help us extend our reach.