Simple, Quick and Easy Outdoor Activities for Infants

  1. Share
0 0

We all know that it’s great to get kids outside and that nature play has a multitude of benefits, but sometimes getting out the door is difficult even if it’s just into your own backyard. If we at least have some idea of what we are going to do once we are outside, then we are one step closer. For infants, the actual activity really isn't as important as just giving your baby new experiences. These activities for infants are all simple, quick and easy and should be able to easily incorporated into your routine.

Here are some activities for infants to 1-year-olds in the great outdoors:

Hiking or Walking Outside

From just about birth, you can start getting your baby outside to hike or walk with you. Whether they are in the stroller, baby carrier or just in your arms, and whether you are hiking a trail or just walking back and forth in the driveway, getting outside and moving is a beneficial experience for you and your little one.

Tummy time, Reading or Playing Outside

Bring your normal inside activities outside to the fresh air. Grab a blanket and some books or toys and take playtime outside instead of inside.  Even just napping or nursing your infant outside can feel like a new experience.
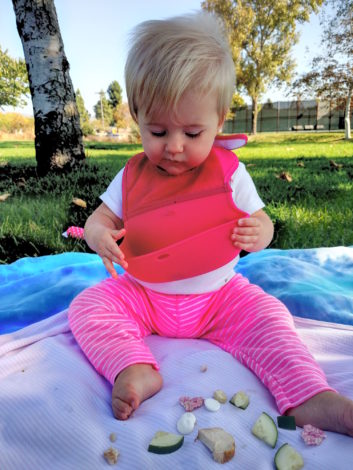
Simple, Quick and Easy Outdoor Activities for Infants by Kirby Crawford for Hike it Baby (image of a little girl eating apples on a picnic blanket)

Picnics

What a better place to start your baby on new foods then outside? Sit them on a blanket and picnic together while they try out new foods and new ways of feeding themselves. Added bonus: cleanup for you doesn’t involve scrubbing floors, walls, windows or high chairs. If they still need support when sitting, try a “bumbo” type seat with a tray or just bring their high chair out with you.
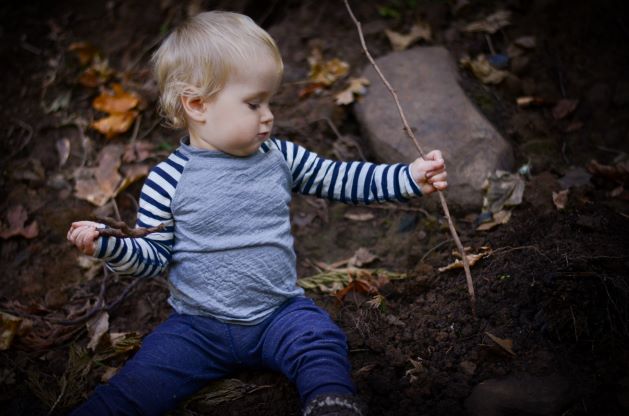
Sensory Play

One of the key elements for development in babies is sensory play and the outdoors is filled with new things to explore and stimulate their senses. Let them crawl around in new terrains – grass, dirt, sand, leaves, etc. Let them pick up new materials – rocks, sticks, sand or mud. Just keep a careful eye to make sure their new finds don’t turn into their next picnic.

Get dirty

Don’t be afraid to let them get dirty! Let them squish the mud or scoot through the dirt or roll around in the grass.  If you don’t want to rush to the bath tub afterwards, then move right on to one of the next activities below…

Water Play

You can take them to a pool or body of water and take them in the water with you, or fill a few bowls with water and let them splash around with their hands. Don’t overthink it – babies thrive on simplicity.

Playgrounds

During off hours, when there are not many bigger kids around, playgrounds can be perfect places for babies to work on new large motor skills, such as crawling on new surfaces, pulling up and climbing.

Bubbles

Babies love bubbles. They are easy and cheap (if you are ambitious, you can make your own following this recipe) and you are sure to get some giggles!

Balls Simple, Quick and Easy Outdoor Activities for Infants by Kirby Crawford for Hike it Baby (image of a mom and her baby girl practicing walking along a beach)

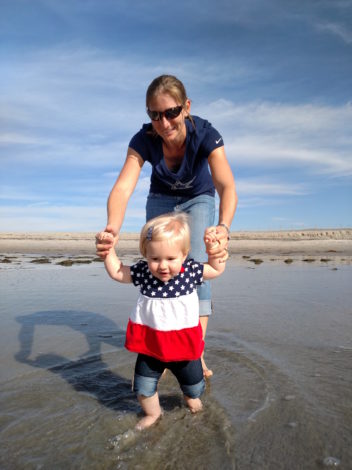
One of the best toys for little ones are different sized balls for them to push around and watch bounce.  Outside is the perfect place because there is nothing to hit and plenty of space. Feel free to experiment with different size balls. This will help with both gross and fine motor control.

Walking Practice

Once your little one starts trying to walk, bring them outside where there are less sharp edges and lots of softer surfaces for the inevitable spills. The only downside is that they may become more interested in a new discovery on the ground and may not get very far!


Photos Courtesy of Kirby Crawford, Ashley Scheider and Kim Ives

What are your favorite outdoor activities for infants? Share in the comments below!    


ABOUT OUTGROWN

OutGrown is a 501(c)(3) nonprofit that works to create a world where everyone can enjoy the physical and mental benefits of spending time outside. We are focused on creating opportunities and removing barriers to access so families with babies and young children can take their first steps outside. We believe all families have the right to connect with nature, benefit from spending time outdoors and be inspired to a lifelong love of nature. Since its grassroots inception in 2013, OutGrown is a growing community of 280,000 families and over 300 volunteer Branch Ambassadors. More information on all of our programs can be found at WeAreOutGrown.org 


EDITORS NOTE:

We hope you enjoyed reading this article from OutGrown. We’re working hard to provide our community with content and resources that inform, inspire, and entertain you.

But content is not free. It’s built on the hard work and dedication of writers, editors, and volunteers. We make an investment in developing premium content to make it easier for families with young children to connect with nature and each other. We do not ask this lightly, but if you can, please make a contribution and help us extend our reach.

Community tags

This content has 0 tags that match your profile.

Comments

To leave a comment, login or sign up.

Related Content

0
How to Layer Yourself and Your Baby When Babywearing in the Cold
Winter is upon us, and as much as this weather makes us want to hibernate and never leave the house again, at some point, we have to venture out in the cold. And that might mean bringing baby with us, too. Babywearing is a great way to keep babies safe, dry, and warm in winter weather. Here's everything you need to know about layering when babywearing in the cold. Basics of Layering The most important thing you need to do is to maintain a normal body temperature for both baby and you. For the same reason you must put your own oxygen mask on first in a plane emergency, you need to have all your faculties to properly care (or wear) a child. So take care of yourself and make sure you are bundled up before you get baby ready. In the winter, both the cold and sweat are your enemies. Too cold and you risk health issues like hypothermia, frostbite, extreme dry eye pain, even trench foot.  Too many layers can cause you or your baby to overheat, leading to sweating (your body’s natural cooling-off mechanism). Once the sweat touches the cold air, you'll begin to cool down even faster, speeding up the cold risks mentioned above. The key to keeping both you and baby warm is layering. Wearing layers help trap in heat, keep the sweat away, and can be removed/added as needed to keep you both at the optimal temperature. Here is a wonderful infographic from an Antarctic travel site. In a nutshell, you and baby need a base layer to keep you from sweating, an insulation layer to keep you warm, and a waterproof layer to keep you dry and cover all your extremities. The layers can vary depending on the weather outside. For example, a raincoat would be perfect for a typically cool, drizzly Portland winter day but not warm enough for snow at Timberline. Here is an infographic from an outdoor sports retailer on layering for different temperatures. Now that you get the basic layering idea, you may be wondering how to apply this to your baby. The most important thing to remember when wearing in the cold is that the carrier counts as a layer. And, if you are using a wrap, multiple pass carries count as multiple layers. You need to adjust your layering accordingly. Less clothing or a different carrier may be necessary to keep a normal body temperature. For example, if it’s cool and rainy, a base layer, jacket, and a waterproof SSC is a good combination. If it’s snowing and windy,  base, insulating, outer, hats/gloves and a thick woven wrap in a double hammock would be a great option. Below are some examples of layering for a baby in different winter weather types. Cool When it’s above freezing, but not warm by any means. ​Or maybe it is freezing, but you aren’t going to be outside long; for example, running into the store. First photo: Base layer of a thicker long sleeve onesie and thick pants. Wool pants are a great choice. Second photo: Add warm gloves and socks. Third photo: Warm, but not bulky coat. Fleece and wool work well. Add a hat if no hood. Fourth: Carrier, no need for multiple passes. For a quick babywearing up, try a ring sling if you're just taking your baby out of the car seat and into a store. Total: 2 clothing layers, plus extremities covered, and one carrier layer. Cold When it’s cold, closer to freezing, and no precipitation. Making sure extremities are well covered will keep baby warm. First photo: Base layer of wool socks and a long-sleeve onesie. Second photo: Warmer layer, I did overalls, but a shirt and pants would be great as well. Wool is a great fiber for this layer. Third photo: Leg warmers/more socks over feet and legs to keep ankles from being exposed. Fourth photo: Outer layer of a fleece one-piece suit. Make sure it is on the bigger side so it doesn’t pull on baby’s feet in the spread-squat position. ​Fifth photo: Carrier, with multiple passes, as needed for warmth. Total: 3 clothing layers, extremities covered, and 1-3 carrier layers. Colder When it very cold or just above freezing, layers under a snowsuit are a great option. First photo: Base layer of a thicker onesie. Second photo: Warm pants and a long-sleeve shirt. Wool is a great fiber for this layer! Third photo: Leggings or long socks and gloves. Fourth photo: Warm, waterproof one-piece suit. Hand and feet covers. Make sure it’s a little on the bigger side for baby to move freely in the spread-squat position. Fifth photo: Carrier with multiple passes. Total: 3 clothing layers, plus extremities covered, and 2-3 carrier layers. Below freezing or snowing: When it’s below freezing and/or snowing. An extra insulation layer keeps baby warmer and a waterproof layer keeps you dry. First photo: Base layer long shirt, long pants, and socks. Second photo: Thermal shirt, warm pants, and thick socks. Wool is a great fiber for this layer. Third photo: Wool or fleece jacket. Fourth photo: Waterproof jacket, hat, boots (or covered feet for non-walking child), and gloves.  Waterproof pants are also a great addition if your child will be out of the carrier to walk. Fifth photo: Carrier that you don’t mind getting damp. A waterproof SSC is a great option, especially if your toddler might be getting out to walk occasionally. A woven wrap with multiple passes will add layers of warmth. Total: 4 layers of clothing, plus extremities covered, and 3 carrier layers. Now that you've learned how to layer for the cold, stay warm and wear those babies! Read more: Hard-framed carrier: improve the quality of your hike 5 Comfy and cozy winter carriers for babywearing How to carry supplies when hiking with a soft-structured carrier ABOUT OUTGROWN OutGrown is a 501(c)(3) nonprofit that works to create a world where everyone can enjoy the physical and mental benefits of spending time outside. We are focused on creating opportunities and removing barriers to access so families with babies and young children can take their first steps outside. We believe all families have the right to connect with nature, benefit from spending time outdoors and be inspired to a lifelong love of nature. Since its grassroots inception in 2013, OutGrown is a growing community of 280,000 families and over 300 volunteer Branch Ambassadors. More information on all of our programs can be found at WeAreOutGrown.org    EDITORS NOTE: We hope you enjoyed reading this article from OutGrown. We’re working hard to provide our community with content and resources that inform, inspire, and entertain you. But content is not free. It’s built on the hard work and dedication of writers, editors, and volunteers. We make an investment in developing premium content to make it easier for families with young children to connect with nature and each other. We do not ask this lightly, but if you can, please make a contribution and help us extend our reach.  
0
The Ultimate Beginner’s Guide to Backpacking with Babies - Part 2: Gear List
In our first part of this series, we discussed the backpacking basics with a baby on board. In Part 2, we will be getting knee-deep in gear. To the devoted backpackers, their gear list is the key to their heart. Simply asking avid outdoorsmen to see such a list is not something you do on the first date. That being said, by this point in our journey, I feel like we’ve gotten to know each other enough that I am ready to show you ours. If you have never backpacked before, fear not! We're recommending that you just go for a single night on your first outing. You can get away with almost anything in that timeframe. Now we’re not telling you to pack a pair of Levis and a Tommy Bahama T-shirt and call it a day, but we're saying that John Muir was able to carry a cast iron stove as he traversed the Great Western Divide at over 10,000 feet, so you don't have to feel "prepared" before heading out on the trails. Keep It Organized If you don’t keep a checklist of all your gear for your trip, you should! Otherwise, there is a very good chance you'll end up unpacking and repacking your backpack the morning of a trip, just to double check that you remembered to pack an extra pacifier or the baby Motrin. For all you Type A planners, lighterpack.com is a great resource when creating a gear list for an upcoming adventure with your little human. With LighterPack, you are able to list and categorize your gear and include its weight and a website link to the item. Now let’s dive into gear! Overnight Backpacking with a Baby Gear List Detailed List Here are the two gear lists we maintain for our family trips on LighterPack. Each section is broken down by category, location of items in our pack, a link to the gear item if possible and its weight. Dad’s gear Mama and Squeaks' gear General List Below is a general list to help you prepare for your trip! You won’t find any brands here so feel free to add your own style! 1. Packs Dad: 70L Pack with waterproof liner Mama/Squeaks: hard-frame carrier 2. Go-Suits Dad: hat, sunglasses, Buff, l/s shirt, pants, underwear, sock liners, socks, trail runners Mama: hat, sunglasses, l/s shirt, pants, underwear, sock liners, socks, trail runners Squeaks: hat, sunglasses, l/s shirt, pants, socks, soft-soled shoes 3. Extra Clothes Dad: stuff sack, extra socks, extra sock liners, extra underwear, base layer top/bottom, insulated top layer, beanie, gloves, rain jacket, camp shoes Mama: stuff sack, extra socks, extra sock liners, extra underwear, base layer top/bottom, insulated top, beanie, gloves, rain jacket, camp shoes Squeaks: stuff sack, extra socks, fleece PJs, fleece bunting, base layer top/bottom, insulated top, beanie, booties, rain suit 4. Sleep/Shelter Tent, Dad’s quilt, Mama/Squeaks’ quilt, Dad’s sleeping pad, Mama/Squeak’s double sleeping pad 5. Cook System Stuff sack, fuel, stove, pot, pot stabilizer, lighter, small kitchen towel, spork x2, baby spoon, cup x2, small bowl 6. Food Bear canister, 8 lbs of food for two days (3 lbs for adults, 2 lbs for Squeaks) 7. Water Stuff sack, filter, adapter, clean/dirty 1L bladders, 3 1L water bottles w/ sport tops, backup treatment, extra cap 8. Toiletries Ziploc bag, toothbrushes, toothpaste, foot cream, eye care, flossers, sunscreen, lip balm, hand sanitizer 9. Electronics Stuff sack, battery bank, smart phone, satcom device, cords, wall adapter, headlamp x2 10. First Aid Ziploc, small quick guide, baby meds (Motrin in small container with syringe, Benadryl for emergencies only, adult meds, like Motrin, Tylenol, Benadryl, DayQuil and NyQuil), Leukotape strips, various Bandaids, small tube of Neosporin, gauze pads, gauze roll, Steristrips, alcohol swabs, tincture of Benzoin, Q Tip, Ace Bandage wrap, bug repellent, bug net x 2, stroller-fitted bug net 11. Emergency Ziploc, dryer lint, storm matches, extra lighter, paracord, extra AAA batteries, Geartie, multi-tool  12. Diaper Kit Dry bag, gallon zip, quart zip, 10 diapers, 30 dehydrated wipes, changing pad, odor-proof bag, gallon zip w/ baking soda for Squeak’s dirties, quart zip w/ baking soda for grown-up dirties. 13. Other Items Squeak’s lovey, 2 pacifiers with leash, book for night time, teething toy, tether to hold teething toy, retractable mirror for hard-frame pack, pack towel 5 Game Changers Below are five of our absolute favorite baby-specific backpacking gear items we would never leave home without! Sunday Afternoons Kids’ Play Hat - We tried multiple hats for Squeaks before we found this one. We love this hat for its full coverage brim with soft veil back which allows him to rest comfortably in his carrier. We love how adjustable it is, both around the head and under the chin. It also comes in many fun designs and colors! Big Agnes Copper Spur HV UL3 MtnGlo - This tent is absolutely worth every penny. It’s very light but durable, easy to set up, and has plenty of room for a family of three. The MtnGlo lights are just bright enough to see what you’re doing in the middle of the night whether it’s finding the door zipper when nature calls or changing a diaper after a blowout (I never wish this upon any of you).  Read more on 4-person backpacking tents to help you decide what options are good for your family. LilleBaby Retractable Mirror - This mirror allows you to check in on your little one while continuing to hike using a retractable cord and a carabiner,which you can fasten to your shoulder strap Lil’ Sidekick Tether - This is a great way to solve your baby’s fascination with gravity. The tether hooks any toy, cup or bottle onto your carrier, no matter the size. Our Lil’ Sidekick’s job was to hold Squeak’s coveted “Drago” lovie that my son is slightly obsessed with and cannot sleep without. Needless to say, this was not a task for the faint of heart. The tether passed with flying colors. Leukotape - This one isn’t baby-specific, but if you haven’t heard of Leukotape, it’s time to jump on the bandwagon. There is a reason this stuff is in every thru hiker’s med kit. It was the reason I remained blister-free on the John Muir Trail and sections of the Pacific Crest Trail. You can buy this miracle tape off of Amazon for just $10. It comes in a gigantic roll you can partition for your hikes by wrapping it around a hiking pole, lighter or placing it on the backing paper of labeling stickers. If you were entertaining the idea of a backpacking trip with your baby in the future, we hope you found this information helpful! Feel free to ask any questions about our gear list or share your thoughts in the comments below.  Read more: The ultimate beginner's guide to backpacking with babies: The basics Backpacking 101: The next adventure Backpacking 102: Taking the kids Photos by Joe Linehan and Laura Castro. ABOUT OUTGROWN OutGrown is a 501(c)(3) nonprofit that works to create a world where everyone can enjoy the physical and mental benefits of spending time outside. We are focused on creating opportunities and removing barriers to access so families with babies and young children can take their first steps outside. We believe all families have the right to connect with nature, benefit from spending time outdoors and be inspired to a lifelong love of nature. Since its grassroots inception in 2013, OutGrown is a growing community of 280,000 families and over 300 volunteer Branch Ambassadors. More information on all of our programs can be found at WeAreOutGrown.org    EDITORS NOTE: We hope you enjoyed reading this article from OutGrown. We’re working hard to provide our community with content and resources that inform, inspire, and entertain you. But content is not free. It’s built on the hard work and dedication of writers, editors, and volunteers. We make an investment in developing premium content to make it easier for families with young children to connect with nature and each other. We do not ask this lightly, but if you can, please make a contribution and help us extend our reach.