
Don't Drop Your Camera While Carrying Your Kid - A Gear Review

Let’s face it, a camera hanging around your neck while you stoop over to pick up your child is a recipe for disaster. As a volunteer Hike it Baby photographer, I always try to figure out how to get myself, my two children and my camera out on the trail and back home in one piece. Thankfully, my children usually make it home unscathed. But while I chase them and nervously watch as they climb boulders that are larger than I'm comfortable with, it’s my camera that can take the brunt of the beating. Not too long ago, lost in a memory I try hard to forget, I took my camera off my neck and set it down so I could help my daughter. It took only a second for me to realize the mistake as my camera went crashing down onto the paved trail below.
Needless to say, I was sad. Very sad. And the worst part? It all could have been avoided with the right gear. Ever since that fateful mistake, I’ve been on a quest for the best system to keep my camera safe and accessible but allow me to be hands-free. Thankfully, there are great options out there and the following list includes my favorites for any situation and any budget.
Budget-Friendly Options for the Camera Phone Enthusiast
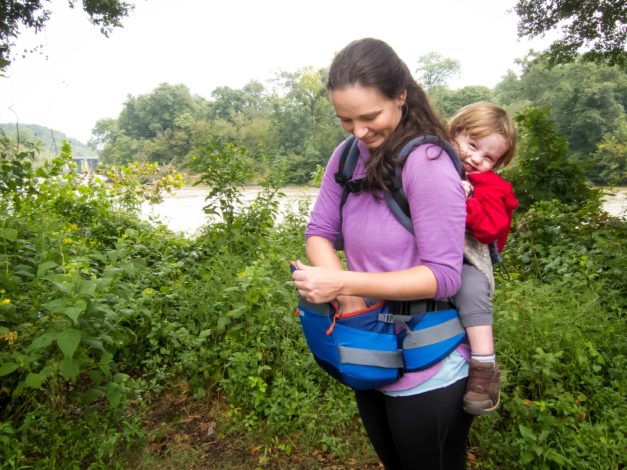
There are some hikes where I feel like my big camera is a little overkill, but I still want to take my point-and-shoot or phone in case anything inspires me. A Hip Pack (aka Fanny Pack) is great for these days. I personally use an Onya Hipster which attaches directly to the belt of my carrier. I love that I only have one strap around my torso. And there’s still room for my small camera or phone, snacks, diapers, wipes and a small first aid kit. If you’d rather have an option that can be used without a carrier, a Deuter Belt is a great little bag. There are a few different options available and it can be worn with or without a carrier. Like the Onya Hipster, it's roomy enough for your camera plus a few more items.
Pros: Small, minimalist design. Easy to take children on and off while wearing the packs. Front- or back-carry compatible. Affordable.
Cons: Can’t be used with larger cameras such as dSLRs.
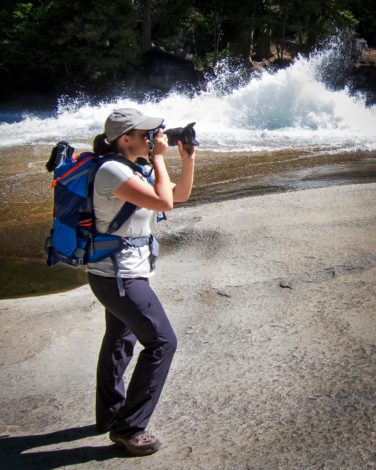 After looking into many different backpack options, there is one that stands out among the rest. The Mind Shift Gear Rotation 180 Panaromic 22L is the pack for me. My favorite feature is the rotating beltpack that tucks away inside the backpack when not in use and slides easily to the front when you need to grab your gear. You never need to take the backpack off to access your camera. I can fit my full-frame camera and an extra lens in the padded beltpack. The best part? The beltpack can be used independently from the backpack and give you two ways to carry your camera.
Since I still carry my son on my back for some portion of almost every hike, I use the beltpack on its own in conjunction with my baby carrier. However, I still have the full backpack as an option for that blessed solo hike and once the kids are fully walking on all of our excursions. As our most expensive option, this pack is an investment, but one I plan to use for years to come. For front-carrying infants, you can use the full pack on your back with room for extra gear. Once you transition to a back-carry, use the beltpack only on your front. Transition back to the backpack once your children outgrow their carrier. As kids grow up, so do their adventures, and I don’t see us outgrowing this pack anytime soon.
Pros: Grows with your child and your hiking/carrying needs. Quick access to camera. Hydration bladder pocket. Comfortable weight distribution. Optional rain cover. Tripod/trekking-pole carry capacity.
Cons: After using this pack for a week in Yosemite, I’m struggling to find the negative.
After looking into many different backpack options, there is one that stands out among the rest. The Mind Shift Gear Rotation 180 Panaromic 22L is the pack for me. My favorite feature is the rotating beltpack that tucks away inside the backpack when not in use and slides easily to the front when you need to grab your gear. You never need to take the backpack off to access your camera. I can fit my full-frame camera and an extra lens in the padded beltpack. The best part? The beltpack can be used independently from the backpack and give you two ways to carry your camera.
Since I still carry my son on my back for some portion of almost every hike, I use the beltpack on its own in conjunction with my baby carrier. However, I still have the full backpack as an option for that blessed solo hike and once the kids are fully walking on all of our excursions. As our most expensive option, this pack is an investment, but one I plan to use for years to come. For front-carrying infants, you can use the full pack on your back with room for extra gear. Once you transition to a back-carry, use the beltpack only on your front. Transition back to the backpack once your children outgrow their carrier. As kids grow up, so do their adventures, and I don’t see us outgrowing this pack anytime soon.
Pros: Grows with your child and your hiking/carrying needs. Quick access to camera. Hydration bladder pocket. Comfortable weight distribution. Optional rain cover. Tripod/trekking-pole carry capacity.
Cons: After using this pack for a week in Yosemite, I’m struggling to find the negative.
Budget-Friendly Options for the Camera Phone Enthusiast
There are some hikes where I feel like my big camera is a little overkill, but I still want to take my point-and-shoot or phone in case anything inspires me. A Hip Pack (aka Fanny Pack) is great for these days. I personally use an Onya Hipster which attaches directly to the belt of my carrier. I love that I only have one strap around my torso. And there’s still room for my small camera or phone, snacks, diapers, wipes and a small first aid kit. If you’d rather have an option that can be used without a carrier, a Deuter Belt is a great little bag. There are a few different options available and it can be worn with or without a carrier. Like the Onya Hipster, it's roomy enough for your camera plus a few more items.
Pros: Small, minimalist design. Easy to take children on and off while wearing the packs. Front- or back-carry compatible. Affordable.
Cons: Can’t be used with larger cameras such as dSLRs.
Quick-Draw Systems for the Ever-Ready
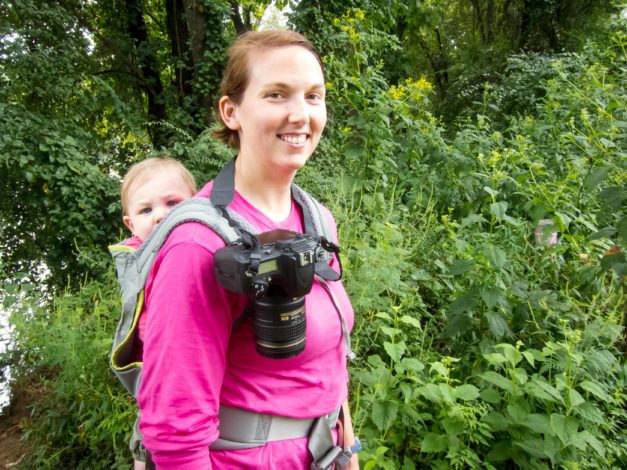
I recently had the opportunity to use the Peak Design Capture Clip Pro on a week-long trip in Yosemite National Park. This little clip has changed the way I photograph forever. I’m no longer worried about taking my big camera out on a long hike as I can be hands-free. The weight is off my neck and is evenly distributed between my chest and shoulders. The clip attaches to any backpack or baby carrier strap while the camera sits securely on top of your chest, easily within arm’s reach, and can be detached at a moment’s notice. My children do a lot of their own walking now, but when I carry my son on my back, I can attach the clip to my baby carrier. It works the same as if I was wearing a backpack. However, if my son needs to get down, I need to remember to detach the camera from the clip before taking the carrier straps off. I keep my camera strap around my neck while I get him on or off. It's also an extra precaution in case I forget to detach the camera before removing my carrier straps. If you are past the babywearing stage and need a great pack to use with your Capture Clip, the Deuter ACT Trail Pro 32 SL is a great option. Pros: Instant camera access without having to open a bag. No dangling camera to accidentally swing into rocks, trees or toddlers. Comfortable weight distribution. Cons: Backup case needed for inclement weather. Back-carry only. Must be removed from carrier when adding or removing child.
A Second Option for Quick-Draw Systems
An alternate to the Capture Clip is the Black Rapid Curve Breathe, an independent strap that rests on your shoulder instead of your neck. Though the camera is still technically dangling with this setup, it can be stabilized by passing your baby carrier hip belt through the strap. Through the use of a fastener included on the strap, the camera will remain securely at your hip any time you need to bend over to tie a shoe or pick up a child. When you are ready to use the camera, simply slide the fastener up and bring the camera to your eye. Though I personally prefer the Peak Design Capture Clip, this can be a great setup if your child is constantly in and out of their carrier. Pros: Can be used in front- or back-carry. Weight is on shoulders instead of neck. Instant access to camera. Cons: Backup case needed for inclement weather. Difficult to remove infant in front-carry. Camera rests on hip where it may run into rocks, trees or your toddler’s head.The Ultimate Backpack for the Creative Wanderer
After looking into many different backpack options, there is one that stands out among the rest. The Mind Shift Gear Rotation 180 Panaromic 22L is the pack for me. My favorite feature is the rotating beltpack that tucks away inside the backpack when not in use and slides easily to the front when you need to grab your gear. You never need to take the backpack off to access your camera. I can fit my full-frame camera and an extra lens in the padded beltpack. The best part? The beltpack can be used independently from the backpack and give you two ways to carry your camera.
Since I still carry my son on my back for some portion of almost every hike, I use the beltpack on its own in conjunction with my baby carrier. However, I still have the full backpack as an option for that blessed solo hike and once the kids are fully walking on all of our excursions. As our most expensive option, this pack is an investment, but one I plan to use for years to come. For front-carrying infants, you can use the full pack on your back with room for extra gear. Once you transition to a back-carry, use the beltpack only on your front. Transition back to the backpack once your children outgrow their carrier. As kids grow up, so do their adventures, and I don’t see us outgrowing this pack anytime soon.
Pros: Grows with your child and your hiking/carrying needs. Quick access to camera. Hydration bladder pocket. Comfortable weight distribution. Optional rain cover. Tripod/trekking-pole carry capacity.
Cons: After using this pack for a week in Yosemite, I’m struggling to find the negative.
Get Out There and Get the Shot
Whatever camera you choose to take out on the trail with you, don’t let your concern over its safety keep you from enjoying your hike! Hopefully you’ll find one of these options helpful for keeping your mind at ease about the state of your gear so you can focus on what really matters: the time with your family and the memories you’ll make!Related Content


Comments