The Ultimate Beginner’s Guide to Backpacking with Babies - part 3: 5 Things We Wish We Knew Before Our First Trip

  1. Share
0 0
  The Ultimate Beginner’s Guide to Backpacking with Babies Part 3: 5 Things We Wish We Had Knew Before Our First Trip by Joe Linehan for Hike It Baby The picture above was taken when our son, Squeaks, was fitted with his pack for the first time. It was also the point I knew that my dreams of sharing my love for the mountains through backpacking with him could be a reality. And how hard could it be, right? I’ve hiked the entire John Muir Trail and much of the cross-country Sierra High Route. My gear list is dialed in. Gordon Ramsey himself would devour my dehydrated sweet potato bark. But like so many other facets of my life which parenthood has challenged, backpacking with a baby was no different. Here are 5 things we wish we knew before we set out on our family backpacking adventures.  (This is part 3 of our Backpacking with Babies series. Be sure you to check out the first part of this series in which we discuss the backpacking basics with a baby on board. And Part 2 talks about gear that's adapted for backpacking with babies.)

1. Practice Planned Flexibility

My wife once told me she thinks I enjoy planning for hikes more than the actual walking. I can’t say I completely disagree, and if my knees could speak after 5 miles of ground-pounding downhill, they would side with her. It’s not that I’m out of shape or that I’m allergic to nature, it’s just that I’m a spreadsheet GOD. I mean my spreadsheets have spreadsheets. There is something comforting about having the itinerary dialed in so much that I know the exact mileage to get to the perfect campsite with the softest dirt and most epic vista. It took all of 5 minutes into a 20-mile backpacking trip with our son to realize this type of hypervigilant planning wasn’t going to fly. In that short time, he made it very clear to us (and everyone else in the Sierras that morning) he had no intention of staying in the carrier for one more minute. So we stopped, took a break, and after some repositioning of his harness and coaxing through song, we managed to tame the beast and get back on trail. We begrudgingly walked on, feeling embarrassed and leery of what was to come. Was all of this a big mistake? Are we over our heads? Is it selfish of us to impose this foreign lifestyle on such a little human? These negative thoughts lingered for a few miles, but as we traipsed deeper into the mountains, they washed away to reveal new feelings of rapture toward the land’s scenery we were passing through. Part of this change in thought was attributed to our son’s mindful eye and the way he interacted with nature. As we allowed ourselves to stop to admire the curious ways he went about exploring rock patterns and pine needle textures, time and space slowed, and any sense of urgency and expectation faded. There were more important things happening here.

You may still struggle with the egocentric inner voices of the backpacker who “once was” pre-baby. Try your hardest to ignore these urges to push harder, go faster and climb higher you will probably have a better time! If you do have the time, give yourself the opportunity to fulfill these urges on different, kid-free trips.

2. There Is No Ultralight Version

When I go out on my “Adventure Dad” trips (backpacking trips without little people), I meticulously maintain a LighterPack account where I log every ounce of gear down to the last Band-Aid. It’s a fool-proof way of making sure everything is accounted for on a trip. Due to its success, I thought it only made sense to start such a list for our family outings. We were initially doing “ok” on weight until we added the 18 pounds of grubbulous squish that was my son at 10 months; the 3-person tent; the double sleeping pad; and the bear canister with food pouches. As we watched the pounds skyrocket, we gave up any hope that this was going to be a lightweight affair. It was time to embrace our inner “pack mule.” This meant breaking out the big guns or in our case, mitigating heavier weights with a few helpful strategies:
  1. Carrying a bigger pack to manage larger volume and weight -  I usually keep gear in a smaller, lightweight frameless pack. These packs are not meant to be used when the total weight of gear exceeds 30-35 pounds. But backpacking with Squeaks, I was easily pushing 40+ pounds in my backpack with all the gear. I ended up using a 70L pack, which not only had the extra volume but carried the weight well.
  2. Using a balanced pack - When carrying heavier loads, making sure your pack is evenly balanced is key. Here are some tips on loading your backpacking by L.L.Bean.
  3. Using trekking poles - Trekking poles are always a good idea when backpacking, but they’re especially helpful when carrying heavier weights. They improve balance and reduce the impact on your knees and leg muscles.

3. You May Have to Play the “Napping Game”

Squeaks was colicky as an infant and the only thing that would get him to sleep was walking. During the “dark ages,” we walked from sun up to sun down to get him to sleep. We still attribute his love for hiking to our rambler ways of old. Consequently, it did not surprise us that he was a good sleeper on trail. Now it wasn’t always the prettiest looking position, but the kid slept. Well, he slept as long as we were moving … The Ultimate Beginner’s Guide to Backpacking with Babies Part 3: 5 Things We Wish We Had Knew Before Our First Trip by Joe Linehan for Hike It Baby 
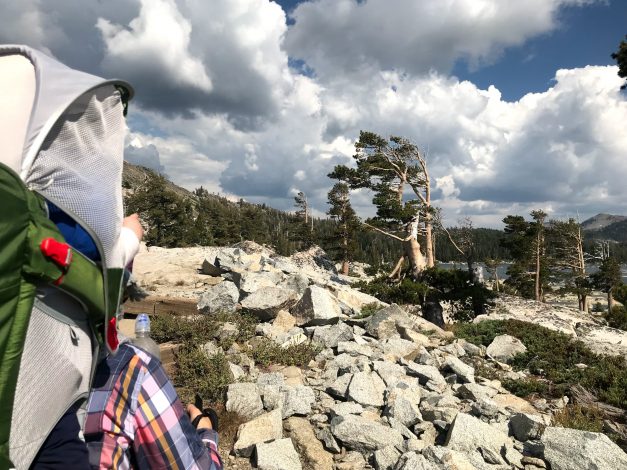
This meant we were often left playing the “Napping Game,” which is a game of sleep time logistics. I’m sure many parents are all too familiar with it. Here are two examples of how this game played out on trail for us:
  1. If Squeaks fell asleep at 3 p.m. and we were only .5-mile from our proposed camp, we would either have to walk past our campsite to another site farther down trail or walk in circles around our campsite until he had been down for about an hour. We’ve done both.
  2. If Squeaks fell asleep at the start of a 2-mile uphill climb of 1500 feet, there was NO STOPPING. We could not stop to catch our breath, drink water or even talk to the nice couple who looked at us like we were going the wrong way heading farther into the backcountry.

If you are incapable of drinking water while walking (like someone’s mama I know) and you have a sleepwalking kid like ours, bring a bladder with a hose so you can drink and walk!

4. Babies Are Not Quiet

Many backpackers venture out to embrace the solitude and quiet reprieve that the wilderness offers. We believe it is our duty to respect this need, whether it be on trail or in camp. That said, we are carrying a baby and babies are not quiet! On one particular trip in the Sierras, after 8 grueling miles of walking,  we crawled into our campsite with a perfect spot overlooking a pristine alpine lake. I had just blown up our 2-person pad when I noticed a hammock set up on the other side of a tree just 50 feet away. After a little investigation, I quickly learned that this hammock belonged to a man who was backpacking with his wife. We relocated as best as we could immediately to a less ideal spot, but in the end we were glad we did so. That night, Squeak’s side of our pad deflated and it was this dad’s job to blow it up every hour (we chose this option rather than dunking the pad into the frigid water in the middle of the night to find and repair the leak). Needless to say it turned out to be a very noisy night!

If your tent site options are limited and you are worried about your baby keeping others awake, be sure to talk to your neighbors about your “situation,” or even pack out ear plugs to offer to other groups!

5. Embrace Your Inner “Dirtbag”

When you’re backpacking, dirt is simply unavoidable. It will fill the cracks in your dry hands and embed itself in your toenails. There will come a point where you will wash your hands clean in a body of water and wipe them dry with your shirt, pants, towel or handkerchief … only to look down and find them just as dirty again. Like your hands, if you try to keep a baby clean in the woods, you will lose! Babies have more cracks and crevasses than glaciers, as I'm sure you discovered this when you were struck by a strange smell coming from your baby and found a "fold" that hadn't been cleaned for some time. We challenge you to embrace your inner “dirtbag!” Unless you plan on packing out pounds of wipes (which you'll have to haul out), forget about the folds for a few days. Forget the face. Forget the feet. And forget the fingers. If you need to hone in on an area, let it be the baby bits. Diaper rashes are not to be messed with on trail!

Dehydrate your wipes beforehand! Leave them out in a dry place for 24 hours before your trip to save weight! Reconstitute with water when you need them.

Parenthood has thrown many new humbling experiences our way and backpacking with a baby was one of them. But with all the failures and lessons learned in the mountains, there has come a newfound sense of inspiration to change what it means to enjoy the wilderness and share that idea with our son. We would not have had it any other way. Comment below and tell us some of the lessons you’ve learned while backpacking with your little one.

Read more:

Backpacking with Babies part 3: 5 Things We Wish We Knew Before Our First Trip by Joe LInehan for Hike it Baby

Community tags

This content has 0 tags that match your profile.

Comments

To leave a comment, login or sign up.

Related Content

0
The Ultimate Beginner’s Guide to Backpacking with Babies - Part 2: Gear List
In our first part of this series, we discussed the backpacking basics with a baby on board. In Part 2, we will be getting knee-deep in gear. To the devoted backpackers, their gear list is the key to their heart. Simply asking avid outdoorsmen to see such a list is not something you do on the first date. That being said, by this point in our journey, I feel like we’ve gotten to know each other enough that I am ready to show you ours. If you have never backpacked before, fear not! We're recommending that you just go for a single night on your first outing. You can get away with almost anything in that timeframe. Now we’re not telling you to pack a pair of Levis and a Tommy Bahama T-shirt and call it a day, but we're saying that John Muir was able to carry a cast iron stove as he traversed the Great Western Divide at over 10,000 feet, so you don't have to feel "prepared" before heading out on the trails. Keep It Organized If you don’t keep a checklist of all your gear for your trip, you should! Otherwise, there is a very good chance you'll end up unpacking and repacking your backpack the morning of a trip, just to double check that you remembered to pack an extra pacifier or the baby Motrin. For all you Type A planners, lighterpack.com is a great resource when creating a gear list for an upcoming adventure with your little human. With LighterPack, you are able to list and categorize your gear and include its weight and a website link to the item. Now let’s dive into gear! Overnight Backpacking with a Baby Gear List Detailed List Here are the two gear lists we maintain for our family trips on LighterPack. Each section is broken down by category, location of items in our pack, a link to the gear item if possible and its weight. Dad’s gear Mama and Squeaks' gear General List Below is a general list to help you prepare for your trip! You won’t find any brands here so feel free to add your own style! 1. Packs Dad: 70L Pack with waterproof liner Mama/Squeaks: hard-frame carrier 2. Go-Suits Dad: hat, sunglasses, Buff, l/s shirt, pants, underwear, sock liners, socks, trail runners Mama: hat, sunglasses, l/s shirt, pants, underwear, sock liners, socks, trail runners Squeaks: hat, sunglasses, l/s shirt, pants, socks, soft-soled shoes 3. Extra Clothes Dad: stuff sack, extra socks, extra sock liners, extra underwear, base layer top/bottom, insulated top layer, beanie, gloves, rain jacket, camp shoes Mama: stuff sack, extra socks, extra sock liners, extra underwear, base layer top/bottom, insulated top, beanie, gloves, rain jacket, camp shoes Squeaks: stuff sack, extra socks, fleece PJs, fleece bunting, base layer top/bottom, insulated top, beanie, booties, rain suit 4. Sleep/Shelter Tent, Dad’s quilt, Mama/Squeaks’ quilt, Dad’s sleeping pad, Mama/Squeak’s double sleeping pad 5. Cook System Stuff sack, fuel, stove, pot, pot stabilizer, lighter, small kitchen towel, spork x2, baby spoon, cup x2, small bowl 6. Food Bear canister, 8 lbs of food for two days (3 lbs for adults, 2 lbs for Squeaks) 7. Water Stuff sack, filter, adapter, clean/dirty 1L bladders, 3 1L water bottles w/ sport tops, backup treatment, extra cap 8. Toiletries Ziploc bag, toothbrushes, toothpaste, foot cream, eye care, flossers, sunscreen, lip balm, hand sanitizer 9. Electronics Stuff sack, battery bank, smart phone, satcom device, cords, wall adapter, headlamp x2 10. First Aid Ziploc, small quick guide, baby meds (Motrin in small container with syringe, Benadryl for emergencies only, adult meds, like Motrin, Tylenol, Benadryl, DayQuil and NyQuil), Leukotape strips, various Bandaids, small tube of Neosporin, gauze pads, gauze roll, Steristrips, alcohol swabs, tincture of Benzoin, Q Tip, Ace Bandage wrap, bug repellent, bug net x 2, stroller-fitted bug net 11. Emergency Ziploc, dryer lint, storm matches, extra lighter, paracord, extra AAA batteries, Geartie, multi-tool  12. Diaper Kit Dry bag, gallon zip, quart zip, 10 diapers, 30 dehydrated wipes, changing pad, odor-proof bag, gallon zip w/ baking soda for Squeak’s dirties, quart zip w/ baking soda for grown-up dirties. 13. Other Items Squeak’s lovey, 2 pacifiers with leash, book for night time, teething toy, tether to hold teething toy, retractable mirror for hard-frame pack, pack towel 5 Game Changers Below are five of our absolute favorite baby-specific backpacking gear items we would never leave home without! Sunday Afternoons Kids’ Play Hat - We tried multiple hats for Squeaks before we found this one. We love this hat for its full coverage brim with soft veil back which allows him to rest comfortably in his carrier. We love how adjustable it is, both around the head and under the chin. It also comes in many fun designs and colors! Big Agnes Copper Spur HV UL3 MtnGlo - This tent is absolutely worth every penny. It’s very light but durable, easy to set up, and has plenty of room for a family of three. The MtnGlo lights are just bright enough to see what you’re doing in the middle of the night whether it’s finding the door zipper when nature calls or changing a diaper after a blowout (I never wish this upon any of you).  Read more on 4-person backpacking tents to help you decide what options are good for your family. LilleBaby Retractable Mirror - This mirror allows you to check in on your little one while continuing to hike using a retractable cord and a carabiner,which you can fasten to your shoulder strap Lil’ Sidekick Tether - This is a great way to solve your baby’s fascination with gravity. The tether hooks any toy, cup or bottle onto your carrier, no matter the size. Our Lil’ Sidekick’s job was to hold Squeak’s coveted “Drago” lovie that my son is slightly obsessed with and cannot sleep without. Needless to say, this was not a task for the faint of heart. The tether passed with flying colors. Leukotape - This one isn’t baby-specific, but if you haven’t heard of Leukotape, it’s time to jump on the bandwagon. There is a reason this stuff is in every thru hiker’s med kit. It was the reason I remained blister-free on the John Muir Trail and sections of the Pacific Crest Trail. You can buy this miracle tape off of Amazon for just $10. It comes in a gigantic roll you can partition for your hikes by wrapping it around a hiking pole, lighter or placing it on the backing paper of labeling stickers. If you were entertaining the idea of a backpacking trip with your baby in the future, we hope you found this information helpful! Feel free to ask any questions about our gear list or share your thoughts in the comments below.  Read more: The ultimate beginner's guide to backpacking with babies: The basics Backpacking 101: The next adventure Backpacking 102: Taking the kids Photos by Joe Linehan and Laura Castro. ABOUT OUTGROWN OutGrown is a 501(c)(3) nonprofit that works to create a world where everyone can enjoy the physical and mental benefits of spending time outside. We are focused on creating opportunities and removing barriers to access so families with babies and young children can take their first steps outside. We believe all families have the right to connect with nature, benefit from spending time outdoors and be inspired to a lifelong love of nature. Since its grassroots inception in 2013, OutGrown is a growing community of 280,000 families and over 300 volunteer Branch Ambassadors. More information on all of our programs can be found at WeAreOutGrown.org    EDITORS NOTE: We hope you enjoyed reading this article from OutGrown. We’re working hard to provide our community with content and resources that inform, inspire, and entertain you. But content is not free. It’s built on the hard work and dedication of writers, editors, and volunteers. We make an investment in developing premium content to make it easier for families with young children to connect with nature and each other. We do not ask this lightly, but if you can, please make a contribution and help us extend our reach.
0
The Ultimate Beginner’s Guide to Backpacking with Babies: The Basics
  Walking deep into the mountains, along rivers to their origins in high alpine meadows where the land meets the sky, I look back and think about how backpacking has made a lasting impression on my life. Since the first time I stepped into the granite playgrounds of Yosemite 15 years ago, I promised my future self that I would share these “yahoo” moments with my kids from the moment they were ready. Well, it turns out that moment for my son came the first time we lowered him into a pack at 7 months old. He looked up at me and grinned with his two teeth, and I knew that excited look on his face. It was the same face my wife tells me I get when I’m lacing up the morning of a trip. It was clear then and there that Squeaks, now 18 months, was a “ramblin' man” just like his dad. After several months of strategic planning sessions, gear adjustments and countless “shakedown” hikes (a practice hike to check gear and routine), my wife and I felt we were ready.  We ventured out on our first of several overnight trips into the High Sierras that summer, but this time, there was a baby on our back. Backpacking with babies: a 3-part series This is the first of a three-part series on information you may find helpful when backpacking with babies. In this first installment, we will be going over all the basics you need to know. In our second piece, we will go over a comprehensive gear list for an overnight trip with your baby, including 5 game-changing items you shouldn’t leave home without. Finally, we'll wrap up our series with a list of "5 Things We Wish We Had Knew Before Our First Trip." Determining the appropriate age I'm often asked, “At what age is my baby ready for backpacking?” The answer is really family-specific. These were our family's contributing factors: We felt uncomfortable backpacking with Squeaks as a newborn. He still seemed too fragile and we were new parents trying to figure it all out. My wife had a very long labor and did not feel ready to haul large loads in the pack until our son was 6 months old. There is a weather window in the Sierras where we do the majority of our backpacking. We wanted to wait for the “thaw” to end. This is when the snow melts and rivers swell, making water crossings dangerous. Considering these factors together, we decided to go on our first shakedown hike in the early summer when he was 9 months old. Going the distance If you're just getting started, I recommend going out for a single night as a trial. Here are some questions you can ask yourself when deciding on the distance of a hike, both miles in a day and overall: How would I rate my hiking fitness level? Is the hike strenuous with lots of elevation change? How well does my baby sleep when carried What’s my baby’s awake time threshold? Most of these questions can be answered in a few shakedown hikes. We ended up hiking around 8 miles per day with a 10-month-old at 8,000 feet. Choosing a carrier Most backpacking families will choose either a hard-frame carrier and have a partner carry most of the gear or a combination of a soft-structured carrier and backpack with one on the front and the other on the back. Hard-frame carriers are generally sturdy and supportive, breathable for both child/adult, adjustable in height, chock-full of extra features and incorporate a wide base which makes loading/unloading to and from the ground a breeze. The downsides of a hard-frame carrier are that they are heavy, require full neck/head control for use, typically take some getting used when it comes to napping on trail, and can be difficult to load children in when wearing bulky layers, especially in winter months. The advantages of a soft-structured carrier are that they can be used prior to baby gaining head and neck control, but make sure you use the proper gear to help prop baby's head per the manufacturer's requirements. They promote more natural sleeping positions, provide warmth for babies on cold days and allow you to monitor your baby easily. However, they may increase strain on your shoulders and back and lead to chafing from the carrier straps rubbing against the straps of your backpack. In general, they allow less room for airflow and obstruct your view of your feet when walking, which can be crucial on more technical terrain. Partnering Up Generally we recommend adventuring with a partner so you can share the load. Divvying up gear allows for weight distribution to help with trail endurance and increases flexibility as it relates to days on trail (more carrying capacity →  more food →  more days). For our family, using a hard-frame carrier was the best option. Mama carried Squeaks in the carrier, his clothes, that day’s food and a few other bits and bobs. I carried everything else but the kitchen sink in big 70L pack, including food packed in a bear canister (we are often in black bear country), water, tent, sleeping bags and pads, cooking kit, clothes, emergency kit, a first aid kit, electronics and a few other loose items. The pack weights came in around 30/45 lbs respectively for a 3-day trip. If sharing the load is not an option for you, have no fear! Carrying both baby and gear on your own can and has been done, just ask this awesome HiB mom! Preparing for naps and a good night's sleep Our son only sleeps when he is moving. This is still true today! Both in the car and while carried, Squeaks wakes up when the motion stops. Every time. On the trail, it meant that once he fell asleep, we couldn't stop moving, no matter the number of uphill switchbacks we were facing or stopping to answer questions from other hikers. When we first starting hiking with the hard-frame carrier, our son’s naps seemed short. He would take 30-minute cat naps and wake up with an unusually short fuse.  After some tinkering and help from fellow backpackers and his loving G-Ma, we were able to make Squeaks a lightweight, waterproof pillow and a sun shade for the front of the pack to block out the visual stimuli (and get the sun out of his face!). We think these two modifications helped improve his trail sleep. When it came to sleeping at night in the tent, we did whatever it took to keep him quiet. I’d like to tell you that our nights went off without a hitch, but that would be far from the truth. Mama and Squeaks slept on a double pad and I slept on a single. We found it useful for my son and wife to sleep level with each other so it was easy to nurse if needed during the night. For sleeping bags, we used two wide down quilts with my wife and son sharing one. He slept in between us and toward the top of the pad, so the quilt only laid across his legs. Choosing the right clothing When it came to dress our little man, we focused on layering, sun protection and clothing that is quick-drying and durable. 1. Layering - Especially when it's cold out, layering is key. If your baby is in a hard-frame carrier, remember they are not warming up through exercise like you. Here's an article on layering in the cold weather to help you decide what and how much to pack. 2. Sun protection - Despite how counter-intuitive it feels, we recommend covering up with UV protective clothing as the primary defense against the sun. This becomes even more important when you are hiking in exposed, treeless areas or at higher altitudes where there is less atmosphere to block the sun’s light. In addition to UV-protective clothing, there are other ways to help you block the sun's harmful rays, such as applying sunblock and wearing hats. 3. Quick-drying and durable- At 10 months, our son was a crawling tumbleweed of death, collecting everything in his path. We needed pants that were quick-drying and durable, so we bought pants that had some synthetic material with interwoven nylon. Using diapers on the trail Disposables or cloth? It’s the age-long debate that all backpacking families encounter. While both options have their arguments for and against, our family decided on using disposables and here’s why: We didn’t want to do more than we had to. Once we unleashed the beast from his pack, Squeaks at this age was a full-time job. After hiking 8-10 miles a day, watching him was exhausting! There were also 142 other chores to complete once we stopped to break camp, and we simply didn’t want to add washing poopy diapers to the list. Whichever you decide to use, remember that what you pack in you must pack out. These Leave No Trace rules also apply to diapers, too! Here are a few additional details when it came to diaper duty on the trail in our experience: We wrote down the number of diapers we used at home over three days and took the average as a gauge of how many diapers to bring. We ended up packing out four daytime and 1 nighttime diaper per day. When it came time for a change, we used a small, water-resistant pad to set Squeaks down on. When we were done changing him, we scooped out the dirties from a soiled diaper and buried them in a 6"-8” cathole, 200’ away from a water source, then placed the used diaper in a large odor-free bag. If we were in camp or on a break, we laid out wet diapers so the sun would dry them out a bit before we put it into the odor-free bag.. We dehydrated wipes before our trip and reconstituted them when needed with filtered water. We had a small travel size tube of diaper cream and hand sanitizer in the same bag as the dehydrated wipes. Planning for food Our family practices a Paleo diet which makes things a little harder when it comes to food. Aside from breast milk on trail, at 10 months, pouches were our best friend. They are not necessarily the lightest option but they are shelf-stable, quick and easy. Our son also enjoyed snacking on dissolvable finger foods and baby puffs when sitting on a break or at camp. Only when he was older did we give these foods in the pack when we felt like he could eat safely and the terrain didn’t jostle him around.  If your baby is not nursing, powdered formula is always an option for backpacking. We packed out something extra tasty for the first day since we didn’t have to worry about it spoiling or fitting into our bear canister. And we always try to incorporate fresh fruit and vegetables. Other options for babies are baby oatmeal, rice cereal, dehydrated baby food and other dissolvable snacks. If you practice baby-led weaning at home, consider early food options when planning your own meals so your baby can eat them too. Just remember, eat before changing your baby into their sleep clothes. Leaving food scents on clothes may lead to night-time visitors! Stow any food, food-stained clothing or hygiene products with scents safely in a provided food locker, hung off a tree/pole or placed in a bear canister. Do not leave food or trash in your tent or unattended in your camp. Considering options for drinking water Treating water while backpacking is a necessary precaution before taking that tempting sip in an ice cold stream, even if you are above the treeline. After all, even marmots poop! There are generally two types of treatments: purification and filtration. If you are curious about the different types of water treatment, this HiB article dives deeper into the subject. For our family, we devised a gravity system using a filtration device to treat water which served us well both in camp and on trail. A gravity system is where you hang a “dirty bag” with unfiltered water above a “clean bag” and connect the two with a filter. This system allowed us to “set it and forget it.” To balance weight, I carried all of the water on our trips in 1L Smart Water bottles with sport tops that both my wife and I could access anytime. Our son also drank from the sport top water bottles with some practice. However, we will probably change our filter setup and use a bladder with drinking hose for the parent carrying Squeaks next go-around simply because it was hard to drink while walking. Now that you know some of the basics of backpacking with a baby, check back for our next installment which will focus specifically on the gear we used. Do you have more questions about the basics of backpacking with babies? Please let us know in the comments below. Read more: Hard-framed carrier: how to improve the quality of your hike How to carry supplies when hiking with a soft-structured carrier How to layer when babywearing in the cold Photos by Joe Linehan and Laura Castro.   ABOUT OUTGROWN OutGrown is a 501(c)(3) nonprofit that works to create a world where everyone can enjoy the physical and mental benefits of spending time outside. We are focused on creating opportunities and removing barriers to access so families with babies and young children can take their first steps outside. We believe all families have the right to connect with nature, benefit from spending time outdoors and be inspired to a lifelong love of nature. Since its grassroots inception in 2013, OutGrown is a growing community of 280,000 families and over 300 volunteer Branch Ambassadors. More information on all of our programs can be found at WeAreOutGrown.org    EDITORS NOTE: We hope you enjoyed reading this article from OutGrown. We’re working hard to provide our community with content and resources that inform, inspire, and entertain you. But content is not free. It’s built on the hard work and dedication of writers, editors, and volunteers. We make an investment in developing premium content to make it easier for families with young children to connect with nature and each other. We do not ask this lightly, but if you can, please make a contribution and help us extend our reach.