
Backpacking 101: The next adventure

One of my intentions this year is to get more backpacking miles in. Backpacking is my solution when you run into the following scenario: You've done one million day hikes, and it left you wanting more time in nature. You've car camped the local campgrounds. You wished for a bit more privacy and isolation.
Enter backpacking as your next adventure of choice. At the very basic, backpacking is loading a backpack full of the gear, clothes and food you'll need; hiking to the backpacking site; camping; and hiking back to the car. Backpacking trips can range from overnighters to 5-month thru hikes of longer trails. But let's start off small.
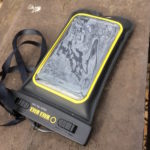 Light up the dark: In addition to my headlight, I'll be carrying a WakaWaka Power+ that functions to charge both my cell phone and as a flashlight. It'll be caribinered to my pack to grab solar energy for when I need it. I've made sure that it's fully charged prior to leaving home, so I don't have to rely on the weather. However, even on 25% power it's able to fully charge my phone and serve as a flashlight.
First aid, emergency prep and knife: I have two kits: a small first aid kit for one person and an emergency kit that contains a Mylar blanket, extra compass, and fire starters. I never hike without a knife or multi-tool. Find one that you love and bring it along. You never know when you'll need it. Plus, if you pack right you'll need to whittle a stick for some marshmallows.
Hydration: Make sure you know if water is available on your route. In this case I'll be bringing a water bladder that tucks into my bag and an additional plastic bag to refill if necessary. I'm also bringing a squeeze style filter to purify water if I resupply. There are many options when it comes to water purification. This one is light and efficient, and I won't regret carrying it if I don't use it. Other choices include sip (inline) filters, pump filters, gravity filters, boiling water, UV sterilization pens and chemical purification tablets. Each style of filter has its advantages and disadvantages and purifies different things. Pick the method that works best for you.
Light up the dark: In addition to my headlight, I'll be carrying a WakaWaka Power+ that functions to charge both my cell phone and as a flashlight. It'll be caribinered to my pack to grab solar energy for when I need it. I've made sure that it's fully charged prior to leaving home, so I don't have to rely on the weather. However, even on 25% power it's able to fully charge my phone and serve as a flashlight.
First aid, emergency prep and knife: I have two kits: a small first aid kit for one person and an emergency kit that contains a Mylar blanket, extra compass, and fire starters. I never hike without a knife or multi-tool. Find one that you love and bring it along. You never know when you'll need it. Plus, if you pack right you'll need to whittle a stick for some marshmallows.
Hydration: Make sure you know if water is available on your route. In this case I'll be bringing a water bladder that tucks into my bag and an additional plastic bag to refill if necessary. I'm also bringing a squeeze style filter to purify water if I resupply. There are many options when it comes to water purification. This one is light and efficient, and I won't regret carrying it if I don't use it. Other choices include sip (inline) filters, pump filters, gravity filters, boiling water, UV sterilization pens and chemical purification tablets. Each style of filter has its advantages and disadvantages and purifies different things. Pick the method that works best for you.
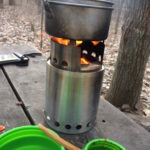 Stove and fuel: One of the things I'm most looking forward to on this trip is a shakedown cruise of our new stove. It's a wood and kindling stove, which is new for me. My other option is a isobutane/propane stove. Depending on whether you're going solo or with a family, the size of stove you want to carry will change. You'll want to make sure that whatever stove you bring you have the appropriate fuel for it. My dad forgot the fuel in the car on one backpacking trip: It's definitely different eating dehydrated meals cold!
Hiking or trekking poles: Hiking poles help in a lot of respects. They increase your balance and help you adjust to the increased weight you are carrying. For hikers with weak knees or ankles, poles can really increase stability. They’re great for water crossings as an additional point of balance. Additionally, they improve the circulation to your hands and arms, which means you don’t have hands that are asleep when trying to set up your tent.
Stove and fuel: One of the things I'm most looking forward to on this trip is a shakedown cruise of our new stove. It's a wood and kindling stove, which is new for me. My other option is a isobutane/propane stove. Depending on whether you're going solo or with a family, the size of stove you want to carry will change. You'll want to make sure that whatever stove you bring you have the appropriate fuel for it. My dad forgot the fuel in the car on one backpacking trip: It's definitely different eating dehydrated meals cold!
Hiking or trekking poles: Hiking poles help in a lot of respects. They increase your balance and help you adjust to the increased weight you are carrying. For hikers with weak knees or ankles, poles can really increase stability. They’re great for water crossings as an additional point of balance. Additionally, they improve the circulation to your hands and arms, which means you don’t have hands that are asleep when trying to set up your tent.
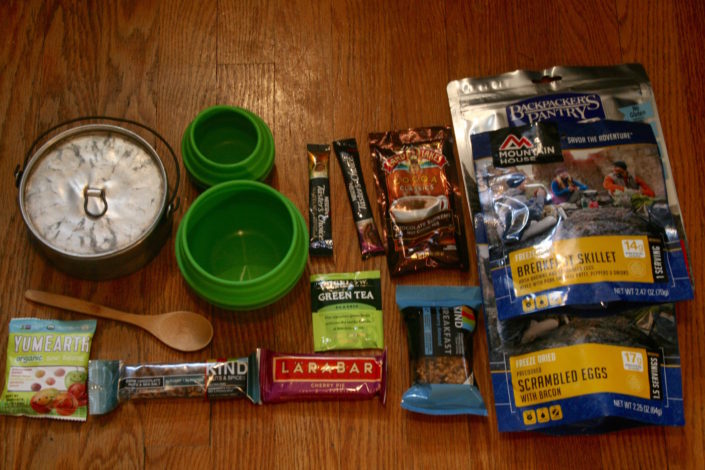 It's not a secret that I run on snacks. I have a bag full of trail mix, some gummies, a few snack bars and some sugar snap peas in my food bag. Additionally, I'm carrying two dinners, some tea for a hot drink with dinner, instant coffee for breakfast, a breakfast package and a meal bar.
I carry all my food inside an odor-proof pouch. Wisconsin isn't bear territory, but if you plan to backpack in bear territory, you'll need a cord and bear bag or a food storage canister. When it comes to dishes, I carry the minimum: spoon, cup, bowl and a pot to boil water.
It's not a secret that I run on snacks. I have a bag full of trail mix, some gummies, a few snack bars and some sugar snap peas in my food bag. Additionally, I'm carrying two dinners, some tea for a hot drink with dinner, instant coffee for breakfast, a breakfast package and a meal bar.
I carry all my food inside an odor-proof pouch. Wisconsin isn't bear territory, but if you plan to backpack in bear territory, you'll need a cord and bear bag or a food storage canister. When it comes to dishes, I carry the minimum: spoon, cup, bowl and a pot to boil water.
Route
Most backpackers don't jump into a 5-month thru hike as their first backpacking trip. There are many reasons for this, aside from financials, like making sure you like your gear and physically training yourself to carry the additional weight of a loaded pack. Ideally, you want to pick a route that has a distance you can cover in 1-3 nights. For my backpacking trip, I wanted to hike a trail that's short, close to home and a new trail to me. The Blackhawk segment of the Ice Age Trail checked off all those factors at 7 miles. This isn't my first backpacking adventure, but I'm trying to work out some gear decisions, so I wanted a trial run. Things to factor in when picking a route- How far can you walk in a given day?
- How many nights do you want to be gone?
- Are there available backpacking shelters or campsites along your route?
- How far of a drive is it?
- Where is the nearest ranger?
- Is cell service good or spotty in that area?
- Will you be walking out and back? Or from one point to the other point?
Permits and Reservations
My current trail doesn't require a permit, but a lot of trails do. Check your route and make sure that you obtain the appropriate permits as necessary. Additionally if you are using a shelter that requires reservations, you'll want to make those in advance if possible.- Obtaining permits can be a simple call to the park ranger office or a lottery style system. Especially if you plan to backpack in the national parks, you’ll want to check the parks’ website. Usually this needs to be done well in advance of your trip. One website to check is recreation.gov, which has the online availability for backcountry sites for most, but not all parks.
- Shelters tend to be run by the park or forest that they are located in. This often will mean a call to the park to check availability and a call to Reserve America. My camping spot in April was available about a month in advance, but I had to compromise on a start day. Had I called earlier, I might have gotten the day I wanted. The most popular trails often have quotas that fill up quickly, so it’s worth checking early to secure your spot.
Gear
On trips where my husband and kids comes with, we divvy up gear, which makes it a lot lighter. But because I'm going alone, I need to make sure that everything I carry fits in one bag. This means I'll probably bring the bare minimum on this trip and pack the night prior to allow me to best judge the weather.
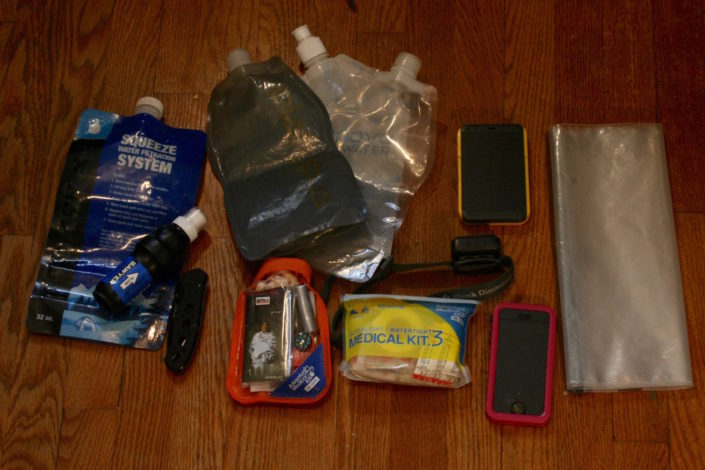
Water filter, knife, extra water bladders, emergency kit, med kit, phone, headlamp, WakaWaka Power+ and a LOKSAK (odor proof bag for waste)
Navigation: I'll have my phone (with a pre-downloaded map of the area), and I'll also carry a physical print-out of the trail. Lastly, I always have a compass in my emergency kit.Light up the dark: In addition to my headlight, I'll be carrying a WakaWaka Power+ that functions to charge both my cell phone and as a flashlight. It'll be caribinered to my pack to grab solar energy for when I need it. I've made sure that it's fully charged prior to leaving home, so I don't have to rely on the weather. However, even on 25% power it's able to fully charge my phone and serve as a flashlight.
First aid, emergency prep and knife: I have two kits: a small first aid kit for one person and an emergency kit that contains a Mylar blanket, extra compass, and fire starters. I never hike without a knife or multi-tool. Find one that you love and bring it along. You never know when you'll need it. Plus, if you pack right you'll need to whittle a stick for some marshmallows.
Hydration: Make sure you know if water is available on your route. In this case I'll be bringing a water bladder that tucks into my bag and an additional plastic bag to refill if necessary. I'm also bringing a squeeze style filter to purify water if I resupply. There are many options when it comes to water purification. This one is light and efficient, and I won't regret carrying it if I don't use it. Other choices include sip (inline) filters, pump filters, gravity filters, boiling water, UV sterilization pens and chemical purification tablets. Each style of filter has its advantages and disadvantages and purifies different things. Pick the method that works best for you.
Stove and fuel: One of the things I'm most looking forward to on this trip is a shakedown cruise of our new stove. It's a wood and kindling stove, which is new for me. My other option is a isobutane/propane stove. Depending on whether you're going solo or with a family, the size of stove you want to carry will change. You'll want to make sure that whatever stove you bring you have the appropriate fuel for it. My dad forgot the fuel in the car on one backpacking trip: It's definitely different eating dehydrated meals cold!
Hiking or trekking poles: Hiking poles help in a lot of respects. They increase your balance and help you adjust to the increased weight you are carrying. For hikers with weak knees or ankles, poles can really increase stability. They’re great for water crossings as an additional point of balance. Additionally, they improve the circulation to your hands and arms, which means you don’t have hands that are asleep when trying to set up your tent.
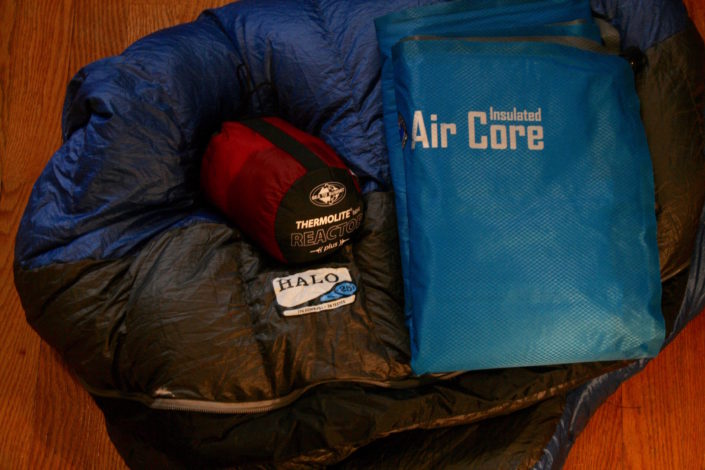
Shelter and Sleeping Comforts
This combination should keep me toasty on a cold night.
I'm opting for a one-man tent in this circumstance because the weather is going to be cold and unpredictable. The tent allows me a bit more warmth than a hammock. My sleeping bag and insulated sleeping pad are also coming with – again for warmth. Additionally, I carry a sleeping bag liner with me that adds 25 degrees of warmth to my bag. It's going to be chilly when I'm hiking with overnight lows in the 15-30 range. So I want to be prepared.Food
It's not a secret that I run on snacks. I have a bag full of trail mix, some gummies, a few snack bars and some sugar snap peas in my food bag. Additionally, I'm carrying two dinners, some tea for a hot drink with dinner, instant coffee for breakfast, a breakfast package and a meal bar.
I carry all my food inside an odor-proof pouch. Wisconsin isn't bear territory, but if you plan to backpack in bear territory, you'll need a cord and bear bag or a food storage canister. When it comes to dishes, I carry the minimum: spoon, cup, bowl and a pot to boil water.
Clothing
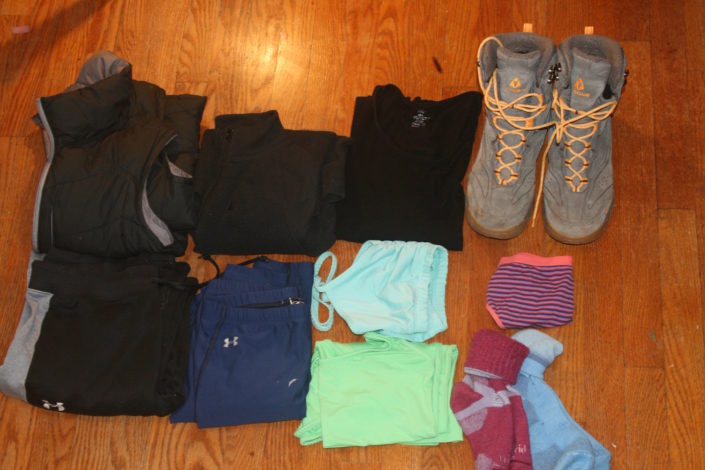
This one is really seasonal – and trail-specific. As I'll be hiking in early April in Wisconsin, temperatures could be anywhere from below freezing at night to 50s-60s during the day. (Though I'd be super lucky if it hit 60.) But I also run cold, so I plan to really carry only one of each item, except socks. Changing into fresh socks once I reach camp makes it feel a bit more cozy and gives my other pair a chance to dry out.
Top Row: down vest, fleece 1/4 zip, Boody long-sleeve, Vasque Pow Pow boots. Bottom Row: Sweatpants, Under Armour cold-weather leggings, Handful Bra, moisture-wicking tank top, wool underwear and socks. Not pictured: winter coat, wool hat, wool hand warmers and fleece gloves.
Here's a short list of items you might want to consider packing. Keep in mind your time frame and hiking climate. You obviously wouldn't want shorts in April in Wisconsin, but they might be best for a backpacking trip in Florida.- Base layers (wool, bamboo or synthetic)
- Mid-layer (fleece, wool sweaters, down vests)
- Element protection (windbreaker, coat, poncho)
- Socks & Underwear (always an extra pair)
- Hat (sun or winter)
- Gloves and neck gaiter
- Sunglasses
- Shoes (trail runners or traditional hiking boots)
- Camp/sleep clothes
And last but not least: the backpack
Not all backpacks are going to work on every body type. You want to find one that fits comfortably on you and keeps the weight over your hips. Trying on different backpacks at the store is important. Most outfitters will have weighted bags on hand to help you get the feel for how heavy the bag will be when it's full. For those of you who have used a framed baby carrier like the Kid Comfort from Deuter, you'll probably find that the brand of kid carrier that was most comfortable is also the one you lean toward when purchasing a backpack. This makes sense, because the style of framing and padding will be similar. There are a lot of great backpack companies, but it’s nice to have a place to start. Keep trying backpacks on at the store until you find one that fits and works well for you.A note on gear accumulation
We are a one-income family, so for us, a lot of the highest-end gear is simply beyond our price range. We have opted to slowly upgrade piece by piece in order to make backpacking part of our family's lifestyle. This method often means that we carry non-backpacking versions of items (read: heavier or bulkier). Other options we have tried: Renting gear, borrowing gear from friends and asking for gear for gift giving holidays and birthdays. One of the things I love about renting or borrowing gear is that it allows me to see if the product works for us before we invest money in it. We also have to choose which items we are willing to splurge on. We received our backpacking tent as a gift, but we've also been able to find good deals on sale sites, used sites and by shopping off season. For our next upgrade, we plan to tackle our sleep system and invest in a double sleeping bag.Backpacking sounds like more work
Backpacking may be a bit more work than car camping. It certainly requires an amount of forethought and planning to make everything go smoothly. However, the challenges in backpacking are also part of the rewards. It's liberating to know that you can sustain yourself for a couple of nights. Additionally, backpacking takes you into territory that you cannot always get to via traditional camping methods. Lastly, once you've acquired a system you like and gear you are comfortable using, it gets really easy to have your backpack set-up to just go. Because the amount of items you are taking is minimal, the first trip of the season often takes the most time to prep. After that, you just grab and go. I'm looking forward to my trips this year. Last year we backpacked once. This year I'm hoping to make it out three or four times. I've caught the backpacking bug. ... Have you? Photos courtesy of Heidi Schertz.Read more:
- Camping with a group: How to plan a stellar ladies' weekend
- Hiking essentials: Staying safe on the trail
Related Content


Comments